
Still on the second level, we set off more traps, get split up, and a new member joins the party, but no one knows about it.
When last we left our heroes, we discovered that the Tomb of the Nine Gods is like Disneyland for sadists. Sure, there are death traps and wacky monster encounters to have fun with, but there’s a ton of work that goes on behind the scenes to make it all happen. We caught our first glimpse behind the curtain when we spotted one of the cleaning crew, affectionately known as Tomb Dwarves, as he scurried down a stairway before we could catch him.
We even saw evidence of a skeletal crew (of actual skeletons) that also run around the dungeon avoiding us, but we don’t know why or what they do. Then we stumbled upon a literal inter-dimensional warehouse, which is an exact duplicate of the “real” dungeon, complete with identical, and functioning, traps and monsters. The Tomb Dwarves use this space to get parts and repair all the destruction caused by all the annoying groups of heroes, who keep setting off traps and dying in the tomb.
As for traps, we set off the “Drown your Sorrows” wine trap in Area 19, labeled The False Tomb. We set it off twice, once in the real dungeon and then again in the mirror universe. We were trying to explore the limits of these dual dungeons, but we only managed to nearly kill ourselves the second time around, when Bag of Nails and Savash were swept off their feet and washed over the railings in the Grand Staircase. Both were lucky to be alive and theirshared near-death experience bonded the cat and the snake as brothers for life.
Later, in Nangnang’s Tomb, a brilliant combo by Gwen and Martic involving the spells faerie fire and banishment ruined all the plans of a deranged and murderous slaad. A Slaad is giant demonic frog from Hell, which is, I suppose, thematic in a tomb dedicated to a dead Grung, which is a tiny anthropomorphic dart frog. D&D monsters are weird. After that, our heroes looted the tomb, which mostly involved Thames using the spell mage hand to shove everything that is even remotely interesting into his magic sack without actually touching anything. Of course, by not touching anything, our heroes avoid all the fun of the dungeon, like getting possessed by a bunch of wacky spirits trapped in the tomb just waiting for some fresh mortal to come by and start touching things!
Right now, our heroes are all together on the second floor of the grand staircase in the fake tomb. Everyone is covered in wine, and no closer to actually stopping the Death Curse that is plaguing the land and stealing every soul on earth for some nefarious purpose. Oh yeah, we forgot all about that quest didn’t we? Technically, Thames has not forgotten, and he is very anxious to save the world. I had given them an arbitrary deadline to get to the Tomb, but that was just so we would get to Omu in time to give our exiting player Theo a proper ending. See Session 40 for that. Now that they are in the Tomb, I tell them that this dungeon exists outside of time and space, and to feel free to explore to your heart’s content. So long as you all don’t die in the tomb, then you will have saved the world in time. Basically, I told him to relax and not worry about it.
They might not have to worry about time, but they don’t want to waste it either. So they decide that there is nothing to be gained by exploring this fake tomb any further. They go back to the real tomb and explore some new rooms on the second level. Starting with:
Area 18 – Devil Pit – I made no changes to this room because it is not really a trap; just another trick by Acererak to make heroes waste time and resources trying to solve a trap that does not exist. It’s another green devil face like in Area 5, but this time it is in the floor. Ooooooh. The impenetrable darkness in the face’s mouth is caused by a spell that can be removed by a simple dispel magic spell. Doing so, removes the darkness and unleashes a swarm of bats; not so much a trap as a nuisance.
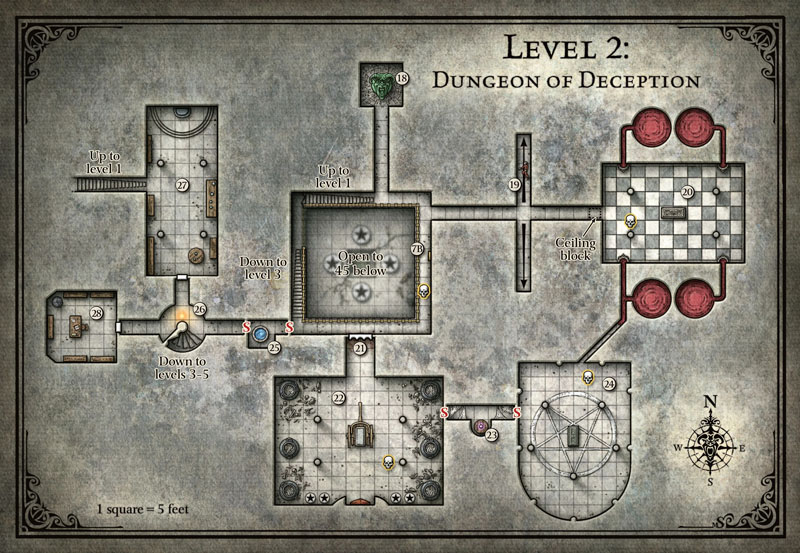
Sadly, none of our heroes are a proper mage and don’t have access to that spell. Instead, they spend a ton of time throwing coins in its mouth, dropping ropes into it, then dropping ropes with stuff tied to the ends, then finally dropping a rope with Martic on the end. And…It’s just a pit that leads into Room 35. A little anticlimactic. And throwing off my rhythm. I’m prepared to run the Second Floor today, not the third! My advice is to expect your group to drop into this hole and for you to learn the basics of this room.
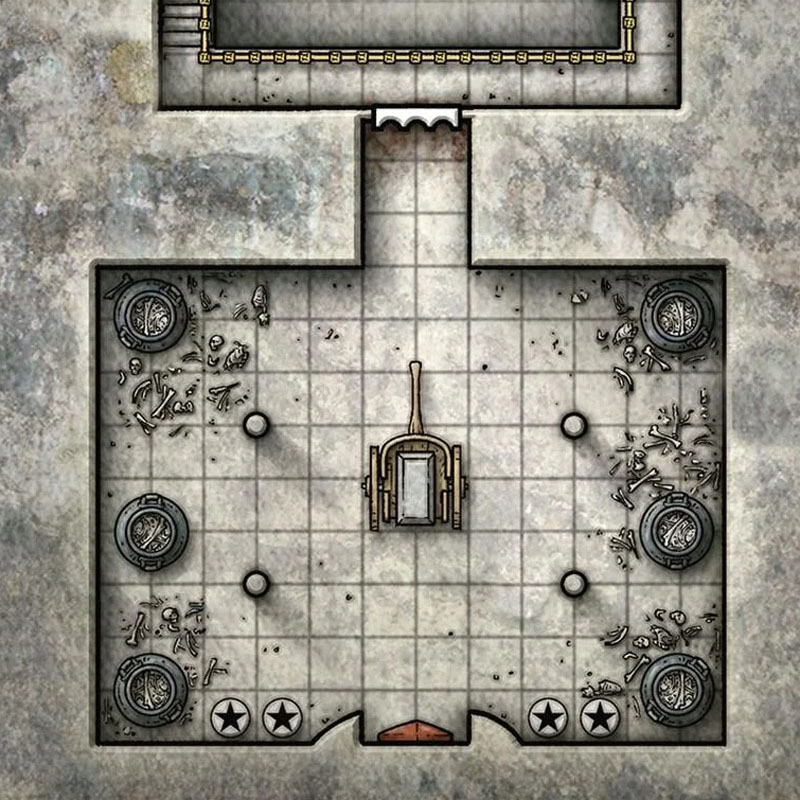
Fortunately, Martic does not want to mess around with this room all by himself. As he is lowered down, he gets a good overview of the room. The book provides a good handout of the room, which I gave to my players. They quickly recognize this as the same type of puzzle like the one found in I’jin’s Shrine back in Session 38. But all of the tile are different than the one’s found in the previous trap. Like before, there is a proper path to be travelled and stepping on the wrong tile out of order is bad. In this case, messing up will release swarm of locusts that will strip the meat off your bones, as evidence by the poor skeleton on the floor. Since they have no idea about the rules of the puzzle, or the proper path, Martic will not be touching any of the floor tiles. No thank you.
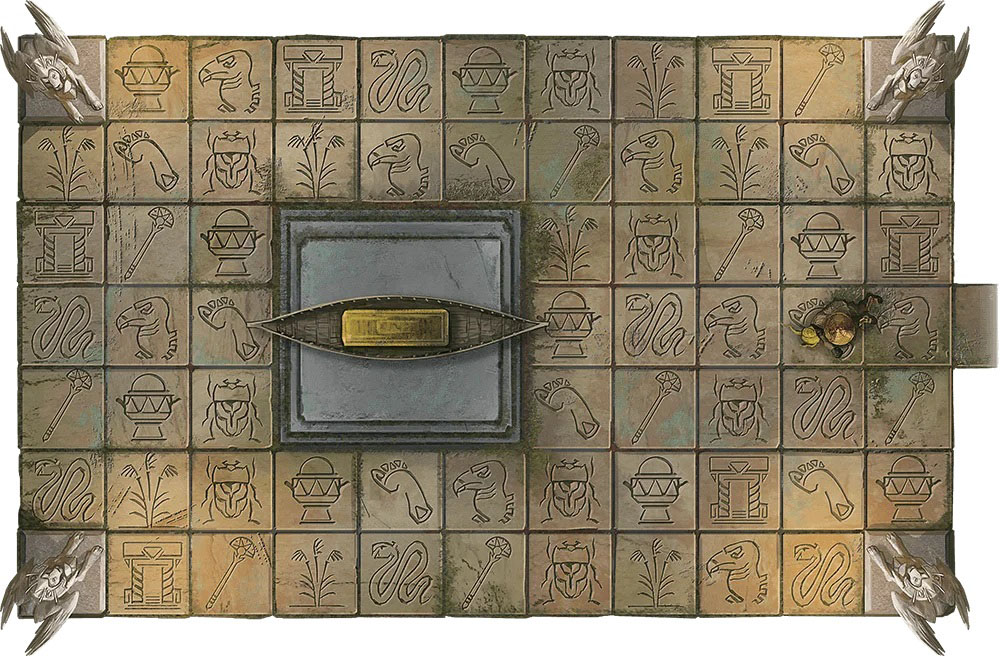
He won’t touch the floor, but what about the raised central dais with the funeral barge and sarcophagus? Well, there’s probably no harm checking those out. Note, that if a PC climbs down a rope, like we did, then that rope will deposit the PC on the tile just in front of the tip of the barge. On the map, this tile has the “urn” glyph on it. It is a simple matter to swing over to the dais, so I gave Martic a DC of 5, to land on the platform without any issue. He passed. My group had worked out that a double-pull on the rope meant “Get me outta here.” Had Martic failed, he would probably have enough time to get himself hauled out of there before the locust could devour him. Probably.
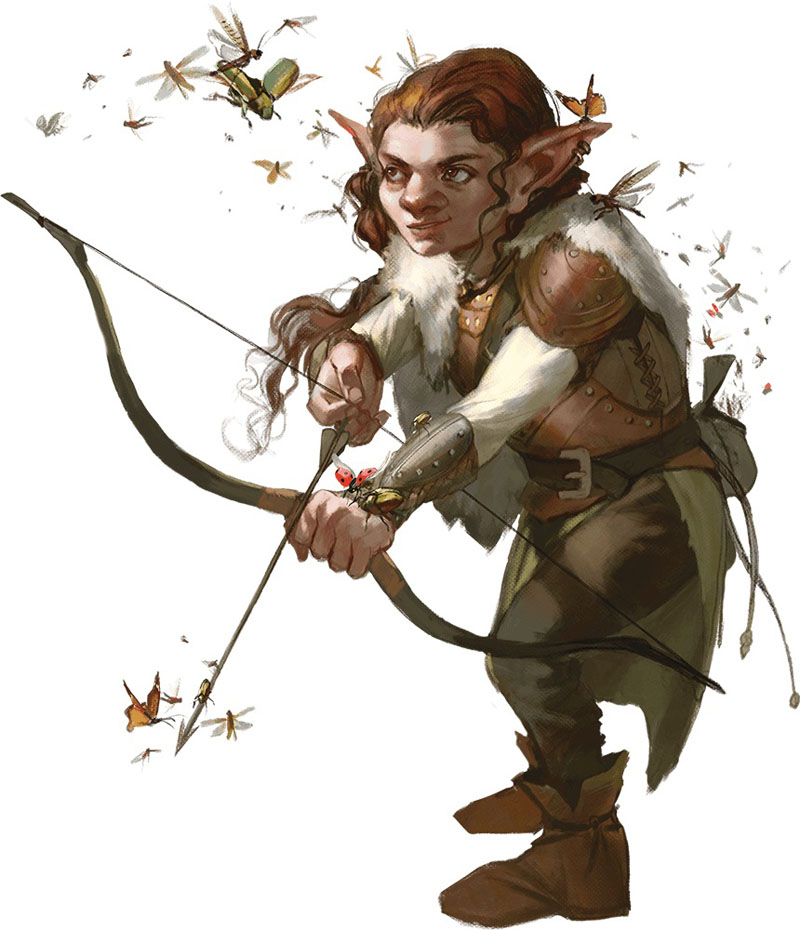
Martic learned that the sarcophagus is sealed and unable to be open. I like that there are multiple ways to enter this room and different ways to avoid setting off the trap, but if you want to get to the treasure then you must attempt to solve the puzzle. Martic knew he could not solve it currently, but he could try a check out the dead adventurer in the room. Except that it is 20 feet away on the deadly tiled floor. Happily, Martic has the perfect ability for this problem. As a swarm master ranger, he has a permanent cloud of insects that surround his body at all times. These bugs can cause extra damage in a fight, shove enemies as need be, and even form a solid platform upon which Martic can stand and hover over dangerous terrain. It’s not as stupidly OP as pure flight, but it came in pretty handy today.
Floating over to the skeleton, Martic sees that it is the remains of a dwarf. From the priestly garb, chain mail, and yellow turban, Martic guessed this was the dwarven cleric of the Yellow Banner Company. This was Bravus Boulderborn, cleric of Clangaddin Silverbeard, as evident by the holy symbol I added to his belongings. Martic also grabbed the bejeweled turban and found the pouch containing the precious gems needed to rebuild Seppi, plus two strange crystal eyeballs, one dark blue, the other purple. These will become useful in the next couple of sessions. Martic also took the shiny bronze shield which will become very useful in just a few minutes. Martic and I played out this excursion privately, so Martic can share as little or as much as he wants about his solo adventure.
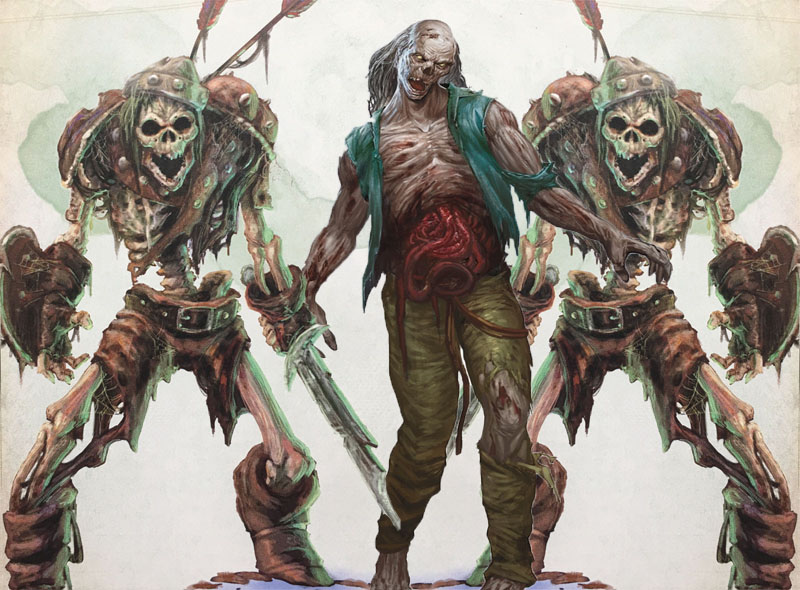
One of the things that bugs me about these Yellow Banner corpses lying around is that the Tomb Dwarves should have removed them long before our heroes ever got there. The Dwarves sole purpose is to fix and clean the dungeon, so as not to leave anything behind for future heroes to benefit from. Plus, we will come to find out that this maintenance crew uses the bodies of dead adventurers to create new Tomb Guardians. So, why did they leave these guys to rot in their pristine dungeon? The books also states that these adventurers were killed months ago, which makes even less sense.
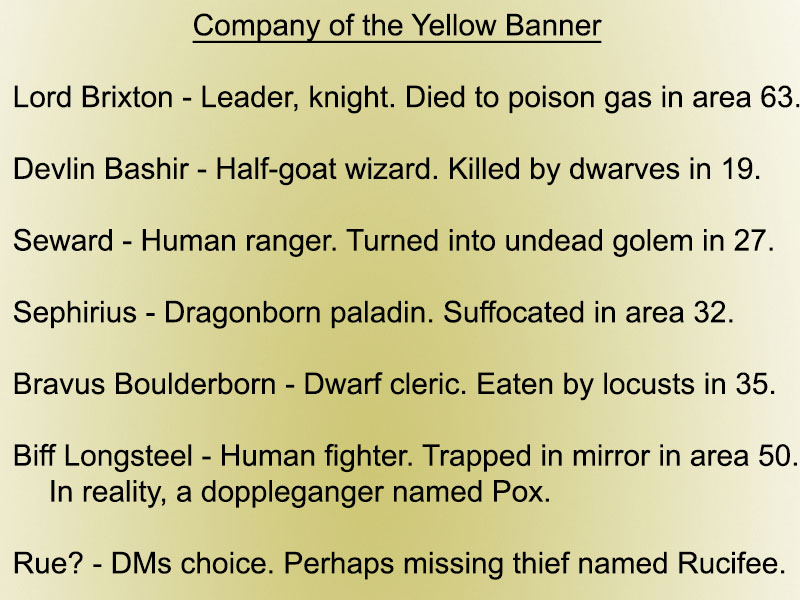
For me, the Company of the Yellow Banner entered the Tomb no more than three days ago, just before our heroes arrived in Omu. Once inside, they travelled immediately to the bottom of the grand staircase, got attacked and split up by the four-armed gargoyles, and died in their separate ways. The Tomb Dwarves were in the process of cleaning up the mess, which explains why Seward is found in the hidden Tomb Dwarf area. But then our heroes arrive and start breaking and dismantling whole sections of the dungeon, much to the irritation and anger of the Dwarves and their boss, whom they have yet to meet.
Now the Dwarves have to clean up our heroes’ mess, ignoring the dead bodies scattered around the Tomb. I would even argue that Devlin (found last session) was killed by the Tomb Dwarves just minutes before the heroes entered the Grand Staircase which explains why our heroes saw one running away. Maybe the Tomb Dwarves were carrying away their dead and injured and didn’t have time to take Devlin with them. This also explains why he was left in such a well-travelled hallway.
While were pointing out plot holes, here’s another. Bravus has two crystal eyeballs on his person. These crystals are scattered all over the Third Floor, as part of the treasure for defeating each room/trap. The pair that Bravus has is clearly meant to be the pair found in this room after solving I’jin Tomb. But how did these crystals get into Bravus’ pouch if he died before he solved the room? While you mull that over, Martic climbs back up the rope, back to the rest of the party. He explains the room, the dead dwarf, and shows them the bronze shield. He keeps the gems and the crystal eyes a secret for now. Together the group moves on to:
Room 21 – Zombie Door. This is another trap that is really just more of a nuisance. It is a neat variation of the D&D trope where you have a ton of content for your players and then they spend two hours trying to get through a door. Except this time, the problem door is on purpose. I didn’t make any changes to this “trap” but my players did come up with a wholly unique and unintended solution, which I absolutely allowed.
The basic gist is that the door is a giant stone slab that raises to open the room. The raising and lowering of the door is controlled by three zombies attached to a pulley system. When the zombies are near to the door, the door closes. When they walk away, the door opens. The zombies are attracted to any fresh meat (i.e. your heroes) standing at the door, keeping the door closed. And there are three holes in the door for the zombies to stick their heads out of when standing at the door. Like one of those cheesy photo-ops you find at cool restaurants and tourist traps.
I’ve been teasing my players with this door for a while. When they first came to the second level, they saw that the door was open, but it closed before they could get to it. As they travelled around the level, they could hear the door open and close as the zombies wandered back and forth, but every time they got near it, the door would close and the zombies would stick their heads out of the holes like a feral dog under a chain link fence.
The book lists a very simple solution to this door. Use the Turn Undead ability of clerics to repel the zombie away from the door. Except, this is wrong. Your group will enter this dungeon as 8th level characters. At that level, the cleric’s Turn Undead ability does not cause the zombie to flee, it disintegrates them. My players instantly realized this and spent so much time finding an alternate solution.
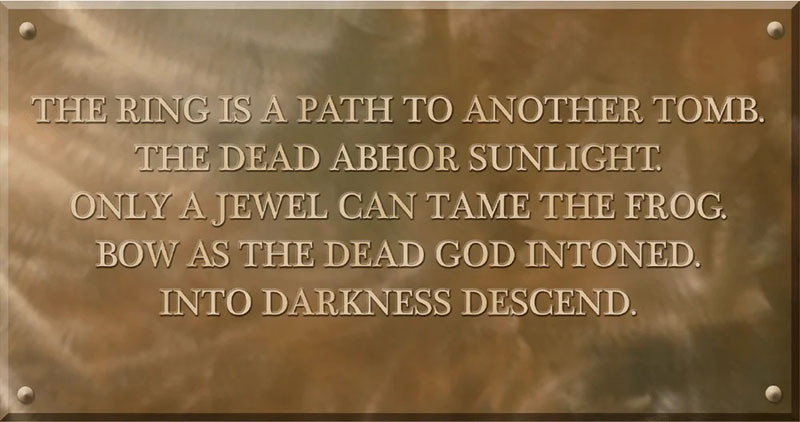
They took inspiration from the Acererak warning that “The Dead Abhor the Light.” This warning refers to The False Tomb, telling players not to open the empty coffin and allow the “sunlight” in the room to strike the inside of that coffin. My players were convinced this clue applied here with the door. They split up the party for the umpteenth time. Martic and Gwen in the False tomb, using the just recovered bronze shield to shine the sunlight down the hall into the staircase. Thames, Grum, and Savash stood at this staircase with mirrors to angle the light into the faces of the zombies at the door. Bag of Nails stood by the door, ready to run in as soon as it opened. This plan was so brilliant that it became our official solution.
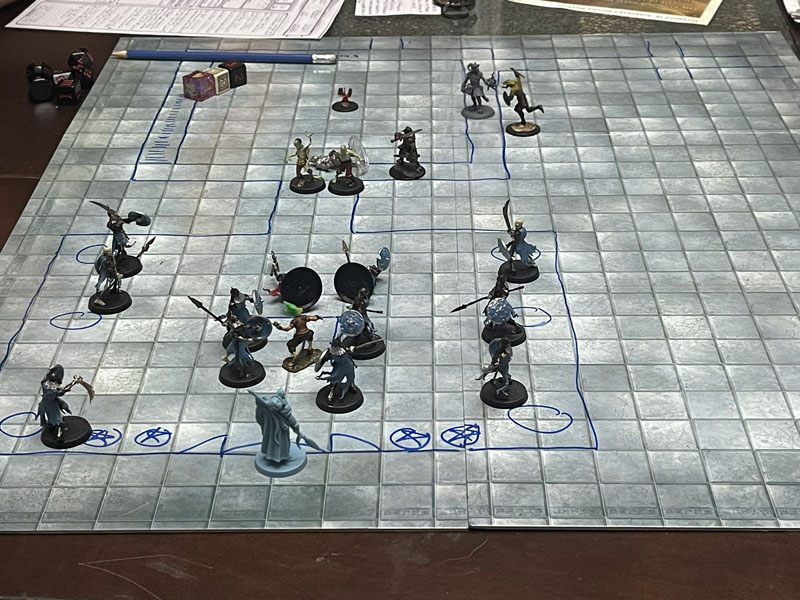
It worked perfectly, and then it all went wrong. Light was blasted into the zombies’ faces and they fled from its brilliance, pulling the door open. Bag of Nails ran inside and entered the next Tomb. But just then, one of those travelling skeletons entered the staircase from the upper floor, flanked by two lumbering Tomb Guardian bodyguards. The golems attacked Thames, Grum and Savash, causing them to drop the mirrors and turn off the lights. With the doorway dark once more, the zombies moved back toward Bag of Nails. Bag quickly killed one of them who went limp and fell to the floor. The two remaining zombies didn’t have the strength to hold the door open. The door slammed shut and the undead flung across the room crashing into the now sealed door. With Bag of Nails trapped inside.
Meanwhile, the Skeleton Key ran down the hall toward Gwen and Martic. But then it turned left and ran into the mirror tomb. Gwen vowed not to let this skeleton get away again and chased after it, leaving Martic to decide whether to help Gwen against a single skeleton or help the group against two powerful plate-armored golems. He chose the good of the many versus the needs of the one, wished Gwen good luck, and ran to attack the Tomb Guardians.
Mean, meanwhile, Bag of Nail was all alone in Room 22 – Papazotl’s Tomb. The spirit of Obo’laka that possessed him told Bag that the cauldrons in the room contain the bones of Papazotl’s devotees who will protect him even in death. I made only one insignificant change to this room. Of the four statues in the room (one of which the PCs must bow to) two hold a spear, one bears a sword, and the last has no face. I changed one of the spear bearing statues to now be carrying a shield, so that each had something different about them. Oddly, this tomb is actually one of the easiest to solve. Just grab everything on top of the sarcophagus and run out of the room. But it is so stupidly simple, that no one would ever think of it.
Yes, our stone door was now closed due to unforeseen circumstances, but Bag’s plan was still to find the treasure, get out of the room somehow and join his friends in the fight with the Tomb Guardians. Bag assumed that the treasure on the coffin was fake and trapped. It wasn’t fake but it was trapped, even though there was nothing stopping him from grabbing it. Instead, he tried to open the sarcophagus, which is the only one in the tomb that isn’t sealed, locked, or magically shut in any way. It is however trapped and activated all the skeletons in the cauldrons and the animated shield on the wall, which quickly surrounded and will soon overwhelm Bag of Nails.
This was a terrifying moment for Bag and was the closest I’d gotten to killing this terribly OP Tabaxi. Twelve skeletons quickly turned into 18, then 24, and the animated shield was horribly effective at hurting our favorite feline. The next hit on Bag of Nails would likely kill him and disintegrate him, turning his bones to ash. I had not mentioned this before, but many of the traps in this Tomb have a fascinating fatality to them. Not only is death permanent, but within the Tomb, the writers decided to remove death saves as well. In some cases. Crushed to a pulp, melted into goo, fried to ash, skinned alive. So many cool ways to die; I love it.
Sadly, this was not to be one of those moments. Bag was saved by two abilities that should not even exist in this campaign. I allowed that Bag could use his Climb Walls ability to scamper up the bodies of one of the surrounding skeletons, springboard over to a wall, scamper over the skeleton’s snatching arms to the sealed door, then stick his head out the single open hole and scream for someone to save him. Next, Thames used his vortex warp spell, introduced in Tasha’s Cauldron of Everything Stupid book, and thus not on the list of un-allowed spells, to teleport Bag of Nails out of the deathtrap and back into the (relative) safety of the grand staircase and a fight with two golems. Screw you, Tasha!
With the party mostly back together, it didn’t take long for our heroes to make short work of these new Tomb Guardians. This makes at least four that our players have faced, and they are beginning to question how many of these things are in the tomb or is it just the same ones over and over again. They strip off the golems’ armor and I describe these two as a tiefling and a human barbarian. This leads the party to correctly guess that these are the bodies of dead adventurers, killed in the tomb. There could be a million of these things roaming around. Our heroes are not comforted by this new knowledge. Good, I like them uncomfortable.
Our heroes have learned of their fate should they fail, bit what of the fate of poor Gwen? She ran off into the mirror tomb, chasing after the fleeing skeleton. It ran out to the staircase and back up to the first level with Gwen in hot pursuit. Tired of the stalemate, Gwen blasted the skeleton with a blight, obliterating the skeleton for 42 points of damage. The skeleton only had the standard 13, but I boosted that to 22, just so she would feel better about wasting such a powerful spell. As per her well-establish personal quirk, Gwen collected the severed skull of this skeleton and saw that it has been carved into the shape of a square. That’s odd. I wonder if that is important? Then she simply rejoined the rest of the group in the real tomb.
Or did she? After the session, Gwen’s player, Ian, and I conspired the most amazing betrayal and it was one of my favorite parts of the campaign. And before you think me too mean and devious, this was all Ian’s idea. Ian had played Tomb of Annihilation before and occasionally he remembers the details of various rooms or traps. Not always, but enough that it is disappointing to play it again and not spoil the secrets.
Last session, our heroes found a letter that mentioned a possible doppelgänger hidden in the Yellow Banner Company of adventurers killed here in the tomb. That doppelgänger is found in Area 50. But what if it wasn’t? What if that doppelgänger has been in hiding elsewhere in the tomb, just waiting for a new group of heroes to come along that it could impersonate? Gwen is all alone; the perfect opportunity for an ambush by a shapeshifter.
And that’s exactly what we did. We ambushed Gwen. From now on, Gwen is gone. Is she dead, unconscious, eaten? Who knows? The doppelgänger Pox has now assumed her identity and will do everything his power to get out of this tomb. And he doesn’t give a damn about the death curse, or yuan-ti promises, or solving any more stupid puzzles. This change in attitude should be interesting to watch, but more importantly, “Gwen” no longer has access to any cleric abilities. This should give Ian a nice, unique challenge to see how far he can pull this off.
Next week, we delve down to the third level, play with wind and water, and suspicions grows as more heroes act strangely.
As always, if a player has a plan to playfully mess with the other players, say yes and Game On!
What the hell are you bums doing laying about. Stop goofing off and let’s get the hell out of this damn dungeon! – New Gwen is not messing around (and swears more)
Don’t forget to check out my Tomb of Annihilation Resources Page, filled with all the stuff I use to make this epic campaign even more epicier: My full Campaign Diary, plus Handouts, Maps, Charts, PDFs, Images, and more to use, abuse, or ignore at your peril. All the templates and instructions for my Trickster Cubes are found here as well.
And written specifically for this adventure, read my Explorer’s Guide to Chult to delve into all the legends, lore, history, religion, and culture that I used to bring even more life to this adventure.


I wonder what really happened to Gwen…
LikeLiked by 1 person
Screw Gwen. I’m all about Pox now. Doppelgängers rule! It does get pretty funny though. Stay tuned.
LikeLike
In Session 43, you mentioned that anything that gets teleported inside the tomb gets sent directly to the Oubliette (room 57.) When Thames used his vortex warp spell to get Bag of Nails out of Papazotl’s Tomb, should Bag of Nails have reappeared in the Oubliette instead?
LikeLiked by 1 person
Yes! I completely agree but Tomb of Annihilation came out before that spell was invented and thus was not on the list of spells that send you to the Garbage Disposal. But to be fair, the no teleport rule is to keep people from zapping in or out of the tomb, not prohibit battlefield teleportation like Misty step, so I allowed it. I would argue that line of sight is needed. Both to see the object of the spell and its target destination.
LikeLike
That seems fair. Thanks for writing these up, I’m excited to see how they wrap up the Tomb!
LikeLiked by 1 person
I think Vortex Warp is from Strixhaven, for clarification.
LikeLiked by 1 person
You’re absolutely right. My apologies. I just assume everything silly and OP comes from Tasha’s.
LikeLike
Most other things do, so you’ve got a good point there.
LikeLiked by 1 person
Hi, Gwen here. Rumors of me being replaced by a doppelgänger are grossly exaggerated. I am obviously still able to cast spells, I simple do not want to right now. Shut up you, whatever your name is.
LikeLiked by 1 person
Still catching up with this awesome campaign ( reading episode 20 atm and loving every word so far). As I am planning to run ToA for my group I tried to steal … ehn find the handouts and charts for ToA, but there is no link. Are they somehow available? Thanks ❤
LikeLiked by 1 person
Thank you for the love. When I show a chart, graph, or handout most can be printed as a jpeg. Often I include a pdf if the handout has a lot of text. If you can’t find it in the post itself, at the bottom of each post I have a link to the Campaign Resource page that has everything in one place. Good luck and have fun.
LikeLike