
Our heroes collect more cubes, make more allies, and royally enrage the second biggest thing in Omu, a zombie T-Rex!
When last we left our heroes, they had miraculously made their way to the Forbidden City of Omu in a mad dash to stop an apocalypse. They also had to rescue an innocent waif named Bucketboy, and murder an immortal snakeman necromancer named Ras Nsi, but not in that order. After soaring down here on the wings of a new commercial charter dubbed Air Aarakocra, our heroes quickly learn that this lost city is not abandoned at all. Roving tribes of kobolds, grungs, vegepygmies, yuan-ti and a whole bunch of monsters are all vying for control over the area. To complicate things further, there’s a gang of Red Wizards of Thay and a mad Tabaxi on a death wish lurking around waiting to ambush our party.

Our heroes have been running around town, collecting a bunch of little stone cubes oddly called “Puzzle Cubes”, but they have no idea why or where this puzzle may be. Each cube has been found at the end of a trapped shrine dedicated to one of nine Trickster Gods that the ancient Omuan people used to worship. So far, our heroes have collected three of these cubes and they know the location of three more shrines. They are pretty certain that those red wizards are hunting for the cubes as well, but again we don’t know why. Our party hunkered down for the night in the most isolated spot they could find, a tiny spit of land that was no more than a tower of rock with a shrine to Moa on it. That this rock happened to be sixty feet from the mainland and surrounded by a lava-filled crater was a bonus. It was unbearably hot, but our heroes guessed that no monsters could get at them here, and they were mostly right.
They awoke with the plan to get more cubes and maybe get some answers, but instead they got more questions. For at this very moment, a crew of seven kobolds were using really long sticks to pole vault over to our heroes’ island hideaway. They carried hammers and saws and they were singing a little song: “We work, we work, our job we must not shirk. To fix the shrine and waste no time, we work, we work. Cerak says a drake he’ll make of us, of us, if we do just what we must to slake his lust, for blood and brine and fear and death, we fix the shrine. We work, we work…” Yes, my kobolds are the seven dwarfs.
Upon seeing our heroes, the kobolds are all startled and drop their tools. “What are you doing here? No, no. You can’t be here, you already broke trap, I mean shrine. Now we gonna fix it. You must go.” I love this little detail that Acererak actually hired these guys to reset all his traps whenever some foolish adventurers set them off. Such a neat answer for decades of dubious players and their constant gripesof, “If this “death trap dungeon” has been killing heroes for centuries then who is fixing everything?” Well, here in Omu, it’s these kobolds. And in the Tomb of the Nine Gods, it’ll be something else just as hilarious (and slightly more deadly.)

Our heroes had a ton of questions for these kobold contractors. After initial hesitation, they were thrilled that someone took an interest in all their hard work. “No one ever cares about what we do. They just break stuff and throw rocks at us.” Unfortunately, they could not answer any questions. “Oh, we can’t tell you that. Cerak would flay our skin and wear it for a hat. I can’t tell you what the cubes are for or how to beat the traps. What’s the fun in that? I can’t even tell you where the other shrines are, although… I hear the view east of here is lovely. Now go. Go away. We can’t have you learning all our secrets, Shoo.” Before shooing off, our heroes left some “snacks” for the kobolds to thank them for all their hard work. It was very sweet. And now, back to our Quest for Cubes.
Our heroes were not brave enough to pole vault back over to the mainland and instead used Martic’s slow but steady bug transport. After that, they took the kobold’s advice and headed east where they found the shrine dedicated to Wongo. This location is supposed to be Obo’laka’s Shrine, but I switched the two because when I had our heroes meet those Red Wizards last session, I wanted them to be coming from Wongo’s Shrine. During that encounter, our heroes met three red wizards, their assortment of goons, and an out-of-place zebra that they constantly ridiculed and mocked as they pulled it roughly by a rope leash. This was a nice clue into the nature of Wongo’s trap if the players are smart.

This is my second favorite shrine in terms of its trap, but it is also problematic because it has a nasty little curse attached to it. That’s why I gave them the red wizard’s hint. I like that this puzzle demands that the party split up (briefly) and I love the logic problem attached to it, although the solution is not as apparent as it should be. In the main chamber, in addition to the giant su-monster statue (cool) there are the masks of four jungle critters: a lion, a boar, a vulture, and a zebra. Now where did we just see a zebra recently? My players deduced that the red wizards were already here (correct), that the zebra they saw was probably a wizard turned into a zebra (also correct) and maybe if those wizards screwed up the trap then maybe they don’t have a cube (not correct). This is exactly what I intended.

It was great fun to watch them work out this puzzle. Some things they got right, some things they got wrong, and some took a long time to solve, but I gave them all the time they needed to figure this out. Don’t rush this puzzle and don’t give them any additional clues (beyond my zebra hint, of course) just to hustle them along. Don’t get frustrated when they take forever. You already know the solution and didn’t have to work out the why. Your players do not, and they are terrified that a wrong choice will mean death for their beloved character. Another reason why I like my zebra hint; hopefully it lets the players know that a wrong guess leads to an annoying, but serious, inconvenience rather than instant death.
My group correctly guessed that they had to choose the correct appendage to get the real cube. They incorrectly guessed that choosing the wrong cube is what led to the wizard being turned into a zebra. Of course, there was no way they could guess that the transformation was due to a failed saving throw. They were determined to select the right cube and not get turned into some silly zoo specimen. They spent forever working out the logic puzzle, because it is impossible to remember all the clues as the DM speaks them. I would make a simple handout that gives them all five clues, exactly as written in the book, so that your players can read the clues to solve the puzzle visually rather than relying on misheard auditory noise and faulty memory.

I don’t remember who stood where, but each of the four heroes stood at one of the masks, so they were all in danger of possibly getting transmogrified. After they wrote down every clue and saw which “hand” each animal was looking at, they reconvened in the main chamber to work out the puzzle. They did solve the puzzle correctly and a cube magically appeared in the correct hand. But instead of a stone cube, a wooden cube had materialized in statue’s grasp. They almost took the cube anyway, when a disembodied voice saved them from the fate of the zebra-morphed wizard. When the voice mentioned a choice between curse or combat, they chose to fight Wongo’s minions, rather than risk being turned into their own animal menagerie.
The fight with the su-monsters was short and sweet and a good callback to when our heroes first fought these guys way back in Session 10 and got thoroughly thrashed. Now it was the heroes doing the thrashing. Once the monsters lay dead, our heroes could claim their prize, but it was no prize at all. As I said it was a wooden cube, not a stone one, and I did not hand my players the usual cube handout, as I did with the other shrines. On the bottom of this wooden cube was written, “Congratulations. Real cube currently in use. Try again later.” It is rare to find moments in D&D when the players realize that other people are doing things that do not involve the all-important PCs. But this scenario is a perfect setup, so I highly recommend having your players fully complete at least one shrine, only to find that someone else (namely the red wizards) have gotten there first.

Disappointed but unsurprised, our heroes were more determined than ever to get the rest of these these cubes as fast as possible. They quickly moved on to Unkh’s shrine, near where they encountered the psychotic Bag of Nail last session. My players were kicking themselves for ignoring this shrine earlier. At the time they had every reason to; they were very low on hit points and resources and they badly needed a long rest, but they were now afraid that the red wizards will have beaten them to another cube. C’mon, I’m not that mean. That moment comes later.
Fortunately, this shrine remained untouched as evidenced by the still present ghasts that attacked them immediately upon entering the shrine. I do like the idea stated in the book that these are Ras Nsi undead marked with his blue triangle brand, and that he is adding his own level of defense to these shrines. But this is the only mention of Ras Nsi doing this, so it isn’t consistent with any other shrine. Plus, wouldn’t the kobold construction crew be killed every time they came near this shrine? So since this is an Acererak trap, I marked these ghasts with the brand of an inky black circle that I introduced earlier in the campaign to tip my players off that there is another necromancer running around in the jungle.

As for the shrine itself, Unkh is dedicated to the flail snail, so it was nice to bring out this mini again, even if it is just in statue form. Of course, every time I place a mini on a map, all the players assume (correctly) that it could “turn on” at any time, and treat it with caution. As for the trap itself, it is one of the easiest and almost inconsequential traps of the lot. All the players have to do is unlock a door with a key, except that between the main shrine room and an outer shed, there are hundreds of keys to choose from. Sure, a player might be impatient and try to force the lock with a wrong key triggering the flail snail to activate. But so long as the players heed the clue, “Contrast all options before acting”, players should figure it out quickly. Perhaps too quickly. The puzzle is solved after you combine six keys into one single key. How can we slow them down just a little bit and make the trap more interactive and fun? With a handout of course, or rather six of them.

I happen to have a bunch of “old” keys that I got in a pack of steampunk accessories from a Halloween store. Seriously, I highly recommend Spirit Stores for weird and quirky D&D props. Just be sure to go the day after Halloween when everything is 50% off. Anyway, I took a photo of one these keys, then photoshopped it, removing bits and pieces until I had six “different” keys. I printed these keys on a sheet of stock paper, cut them out, and when my players inevitably asked what these keys look like I could actually show them instead of ineffectively telling them. Always show, don’t tell.
Roland loved this puzzle and took charge of its solution. With the actual paper keys in hand, he quickly realized that they could be combined together to create the proper key. The best part is after Roland “solved” it, he reshuffled the keys pieces and another player got to solve it, then another, and another; which was an unexpected bonus. Usually, these puzzles tend to be solved by the one player who loves puzzles, while the others sit around waiting for the “smart” one to do all the work. But now, with this easy to make handout, every player gets to be the smart one.

The next best part is even though the puzzle was solved, there was a second layer to the full solution. They knew what the key looked like, but that key isn’t here. Back out to the shed with the hundreds of keys. Now I only had a dozen prop keys (I’m sorry, I did not purchase 100 fake keys just for this gag) and it was a simple task to match the combined key to the real one, but at least I managed to elevate this mundane trap into something tangible that made my players feel smart. Yea, me! I mean, hooray for my wicked smaht friends. Unlocking the staute, our heroes were delighted that this puzzle cube was still here and moved on in search for more shrines.
Moving back across the fallen log spanning the river that nearly killed them twice last week, our heroes were relived that Bag of Nails was off hunting something else today. I guess neither my players nor I felt like dealing with him today. They finally made it to the proper starting point of Omu and found the ruined compound filled with a dozen dead bodies, including red wizards and yuan-ti alike. They ignored the jackals and then they heard the muffled cries for help coming from beneath some rubble.

There they found Orvex Ocrammas the morally dubious scribe that the red wizards hired and then abandoned to die. His only purpose to the players is that he is supposed to be the one who translates all these Omuan runes that give all the clues to all the shrines. Otherwise, you are supposed to play it that your heroes just fumble around and need to solve all the traps without any hints; an impossible task. I got around not having Orvex in the party by extending the duration of the comprehend language charm that my boys got from Orolunga back in Session 35. Still, our heroes allowed Orvex to tag along and I ignored his listed levels of exhaustion because we don’t have time to wait for him to heal properly. I did use Orvex to tell the full “Legend of the Nine Gods” which gives a little context about Omu and these shrines and is a big clue to solve the Tomb Entrance Puzzle later on.
Afters, they ran to Kubazan’s shrine right next door. This was one of the few monsters that I deliberately did not have our heroes meet previously in the jungle, because I wanted to have their first Froghemoth encounter occur here. Plus, it gave me enough time to paint it its massive mini. The fight was fun but unmemorable and took forever due to the froghemoth’s massive amount of hit points. Orvex proved useful since he has the stat block of a spy and I hope that this will lead to our heroes into taking him with them into the tomb to replace the left-behind Benedict. After the fight, someone had the foresight to check the statue in the area and was rewarded with the mandatory key needed to unlock the shrine.

As for the shrine itself, it’s intended danger was completely undone by the ridiculous character addendum that is Tasha’s Book of Nonsense. You are supposed to hop over a series of poles that gets harder with each jump since each pole used disappears. I can not remember if the book states this or not, but I would play it for the shrines that are supposed to be defeated using physical skill, then those shrines are enveloped in an anti-magic field, so now spells (like fly) can’t simply eliminate all the dangers. Of course, that plan does not cover all the inane innate abilities allowed by Tasha’s. Martic used his magic bug carpet to just hover over to the cube, Indiana Jones some random trash onto the cube’s pressure plate, grab the cube, and hover back in about thirty seconds. So much for this deadly trap. FYI, Martic just informed me that the random trash was a broken lute and some cooper coins which added up to the weight of a cube. This led to the phrase, “We really luted that shrine.” Okay, onto the next shrine.
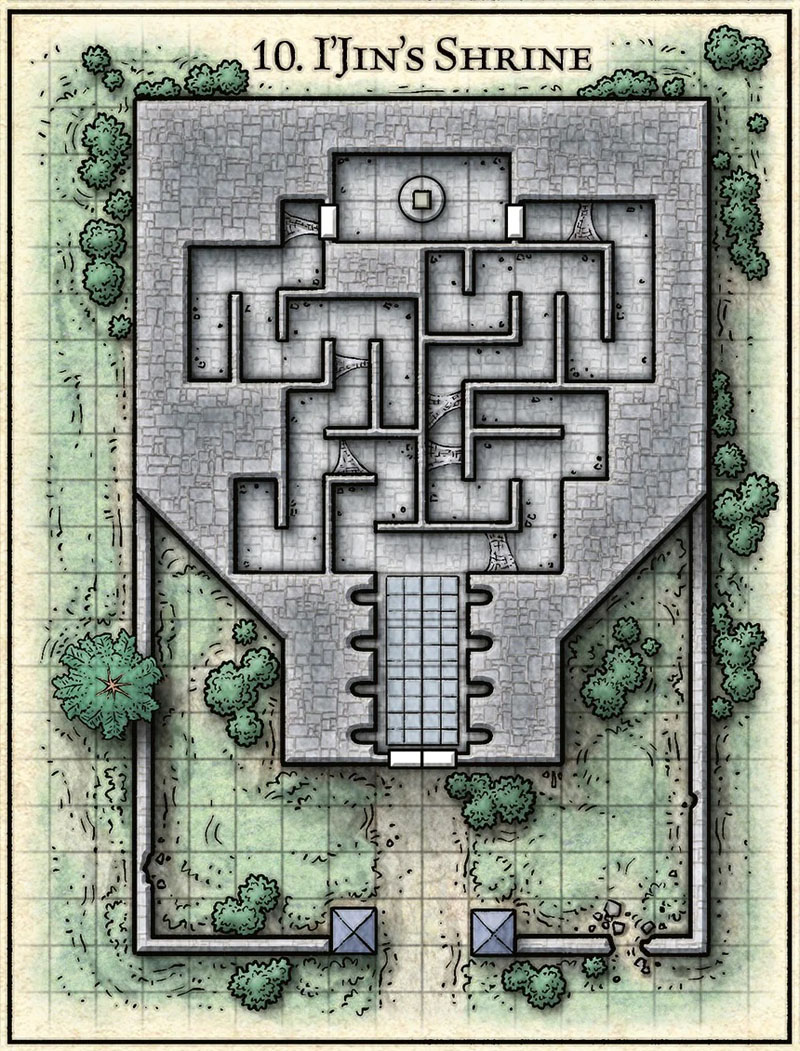
Next was I’jin’s Shrine. This one is my favorite because it comes with its own handout, but the puzzle has a glaring flaw in it that will need to be fixed. The flaw is in the handout itself. The players are presented with a trapped hallway consisting of 32 tiles arranged in an 8 by 4 grid. Each tile has the image of one of 8 animals on it. Based upon I’jin’s clue, your heroes must cross the hallway by never stepping on the same animal twice. Now the book says that you can fly over this trap, but I would add another anti-magic field here to defeat all your cheating airborne players. Thank god the aaracokra had already left.
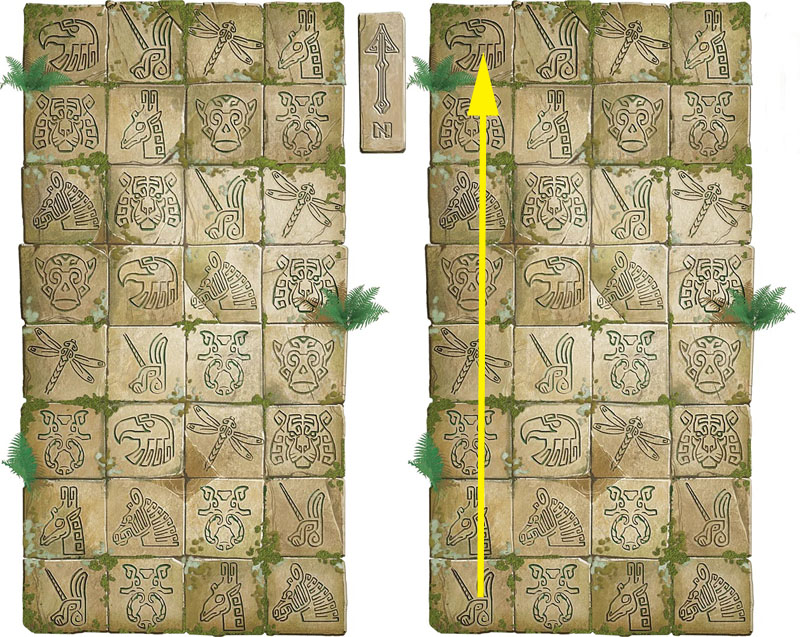
Here’s the problem. The left-hand column of the hallway handout has all 8 animals in a single straight line right to the end. Ta Da! This is the easiest trapped hallway ever and clearly someone at WotC messed up. Honestly, I don’t know how they missed this. I went and redrew the puzzle so that no path went in a straight line and multiple turns would need to be made to make it to the end. I also added an extra twist. I figured my players would each try to solve the puzzle, but I didn’t want them to be able to use the same path. According to the clue, I’jin never takes the same path twice and neither can the players.
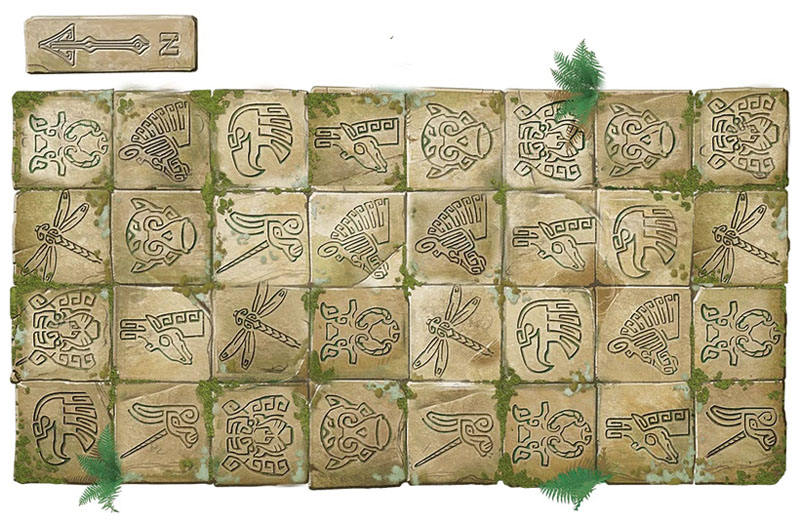
In my new Hallway handout, there are multiple paths that obey the rules of the puzzle and will take you to the end. You could leave it at that and have each player forge their own path so long as it was not exactly the same as a previous player. But I added another level to the puzzle. First, as stated, you must step on each animal only once to avoid the traps. But then the next person to go must also not step on an tile that has already been stepped on by a previous player. This makes the puzzle much harder but way more interesting. My new Hallway handout has one perfect solution, so that four players can each take a different path that does not step on a repeated animal or on a previously used tile. If you have more than four players, I would reset the rule about stepping on a repeated tile, but I would keep the rule against stepping the same exact path.
Here is how this played out at my table. They correctly guessed that they had to step on each animal once and only once. The first player solved it properly starting on the left-hand side with the Almiraj and ending at the Tiger. This is actually the easiest path, for if you just follow the rules, this path guides itself. The second player went and stepped on the same Almiraj, unleashing several poison darts. That player quickly realized he needed to take a brand new path. Starting over with the Boar, his path also took a prescribed route, safely exiting at the Dragonfly. Then it all went wrong.
Next, had the third player started on the far-right path, they would have also been able to follow a simple, delineated path. But he started on the Dragonfly and thought he had a straight shot to victory until he got trapped on the Almiraj on the sixth row, forcing him to step onto his second Zebra and second Boar, dodging poison darts both times. This locked the fourth player into starting on the Tiger and quickly onto his second Tiger and second Monkey, dodging more darts. Then he got boxed in and had to make an awkward jump over to the last safe Dragonfly. I ruled that the DC to make the jump without triggering any darts was “3 + #feet jumped”. Since each tile was 5’ square the DC equaled 8. He jumped successfully and he was able to end on the Eagle without further problems. This was a fun little puzzle. Each player got a chance to solve the puzzle in their own way, I got to throw five volleys of darts at them, and everyone survived. Then afterwards, they spent a long time reworking the puzzle and eventually did discover my “correct” solution. Everyone was very pleased with themselves and it was a great success.
After that, the maze section of the shrine was almost anti-climactic. I even moved all the traps into the hallways and intersections rather than the dead-ends to liven things up. But after triggering the first one, the group was smart and avoided all the rest. At the end, the cube is just sitting on a pedestal, but my group was convinced that it was trapped and took forever to figure out how to get it. Everyone was afraid to touch it and I refused to allow Thames’ mage hand to knock it off the pedestal. Finally, someone got frustrated and just grabbed it, triggering nothing and gaining them a new cube. Six down, three to go.
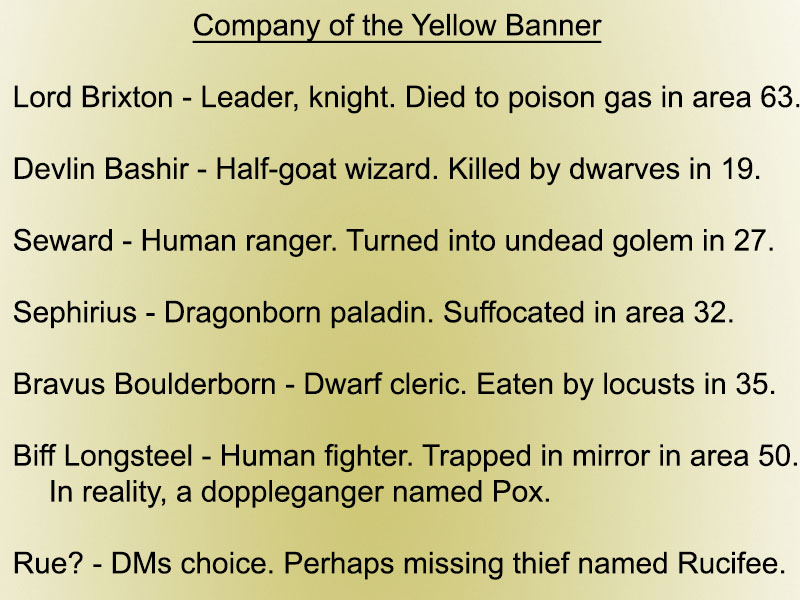
It was around this time that, our heroes also stumbled upon the Adventurer’s Camp and the introduction of the Company of the Yellow Banner via a letter found in the camp. How I wish that the authors had made any reference to this group in the beginning of the book. I would have foreshadowed the shit out of this amazing group of adventurers that arrived just before our heroes did. Tales of their exploits would have been legendary and my players would be dying to meet them. Alas, our heroes can now only discover them as a trail of corpses scattered throughout the Tomb. Also, I have no idea who “Rue” (the letter’s intended recipient) is. This name is never mentioned again and none of the Yellow Banner are called this. In a wierd coincidence, my dog is named Rue, so I like to think that Lord Brixton wrote this letter to her.

The Yellow Banner is seeking a legendary artifact called the Eye of Zaltec which is another missed foreshadowing opportunity. There are four “Fabled Treasures” hidden in the Tomb, but there is no mention of them until they’re just about to enter the tomb. But by this time, it is too late. Maybe the authors didn’t want to distract players with a half-dozen names they’ll likely forget and these end-game treasures while they were still mucking about in the low-level jungle. But c’mon WotC, give us the option. I would have loved the chance to tease my group with these NPCs and these tantilizing treasures.
Foreshadowing is an amazing narrative tool that lends an air of mystery and realism to your story. To learn about something at the start of the story that comes back into the story at the very end, gives a sense of gravitas and connection to the entire story. If I could have introduced these things from the beginning, then when they show up again later, my players will think to themselves, “Wait, we learned about this thing ages ago. It must be important. We need to remember this.” But now, when I tried to introduce these things out of the blue, my players’ attitude was, “We already got too many things to think about. We don’t have time for this. Put it at the bottom of the pile.” Handled in this way, the Company of the Yellow Banner and all these Fabled Treasures won’t even matter to your group.
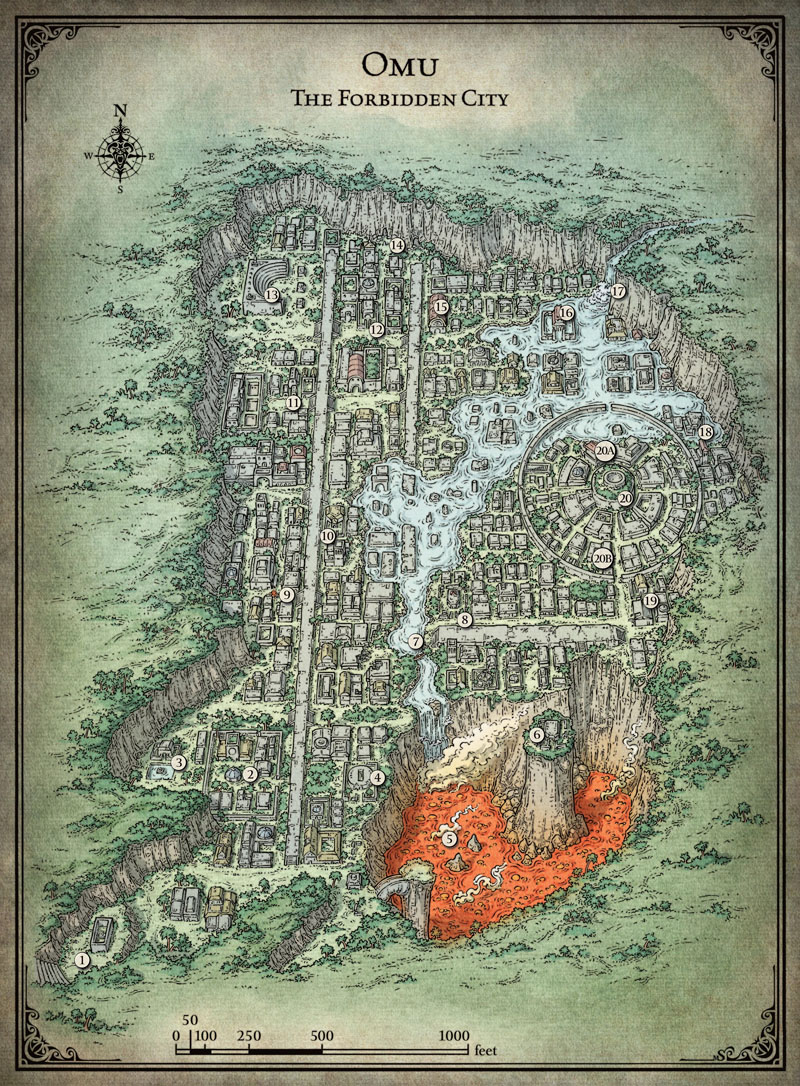
At least our heroes now learned the location of Acererak’s Tomb. They headed north looking for it, and ended up at the very back of the Omu crater along its northern wall, where they discovered some vital answers and encountered a really big problem. The first thing they discovered here was a fifteen-foot-tall obelisk. This cracked stone obelisk was surrounded by the broken bodies of three shattered gargoyles. The party realized that these were the same gargoyles they killed when they first arrived at Omu. They had landed at the very spot they needed to be and didn’t realize it.
Searching the obelisk, they confirmed that they had discovered the entrance to Acererak’s Tomb. They learned this when they cleared away the lichen surrounding the obelisk and found words carved into the stone that are Acererak’s First Warning. I will discuss these warnings later when we actually enter the Tomb, but I will say that I love these Warning and they are such a brilliant way to evoke the witty riddles of the original Tomb of Horrors and perfectly reflect Acererak’s whole trolling players vibe. For now, it only matters that the party knows this is the location of the Tomb. They just need to find the actual entrance and discover how to get inside.

The entrance is easy enough. Just north of the obelisk there is a perfectly square ten-foot-wide, fifteen-foot-long tunnel carved right into the cliff face. The tunnel ends at a massive slab of worked stone. Craved into the stone are eight perfectly square alcoves arranged in a circle with carved lines connecting the opposite niches making the whole display look like an eight-pointed star. Each alcove is the perfect shape and size to fit one of the puzzle cubes that our party have been diligently and unknowingly collecting. At least we know what these cubes are for now. We just need to figure out the order in which to put them. And we only have six, but this puzzle indicates that we need eight. We’ll be back.
Back outside, our heroes also discover a smaller tunnel carved into the east face of the cliff. Inside this tunnel, most of our heroes discover the series of statues lining the walls of this tunnel. Each statue depicts one of the nine Trickster Gods. Each statue sits opposite another Trickster statue and if you are paying attention, this tunnel gives away the entire solution to the Puzzle Cube Problem. Only one statue is missing; Unhk the Flail Snail, which is odd. They search for secret doors but don’t find any at this time. Unfortunately, Thames, who is currently holding all the cubes, refused to enter this hall believing it to be trapped, and did not trigger the event which would have made this whole room much easier, for he was holding the Unhk cube at this time after all.

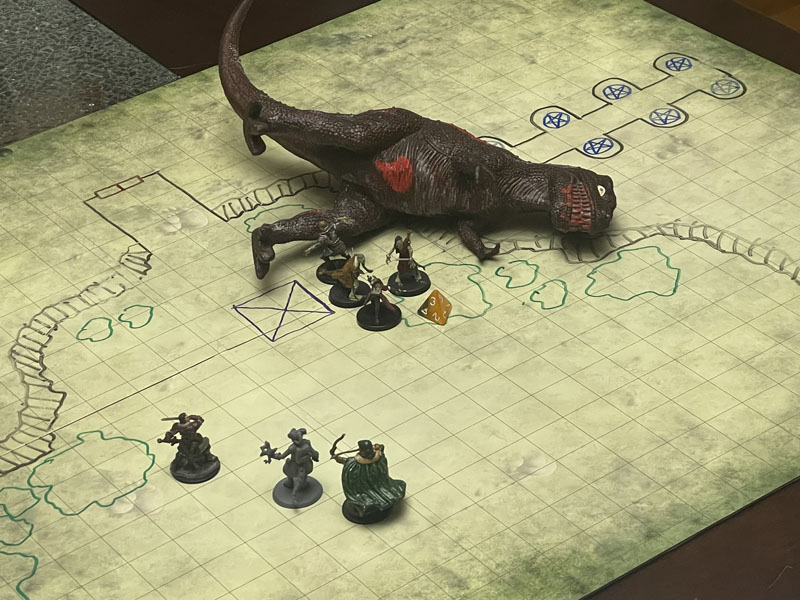
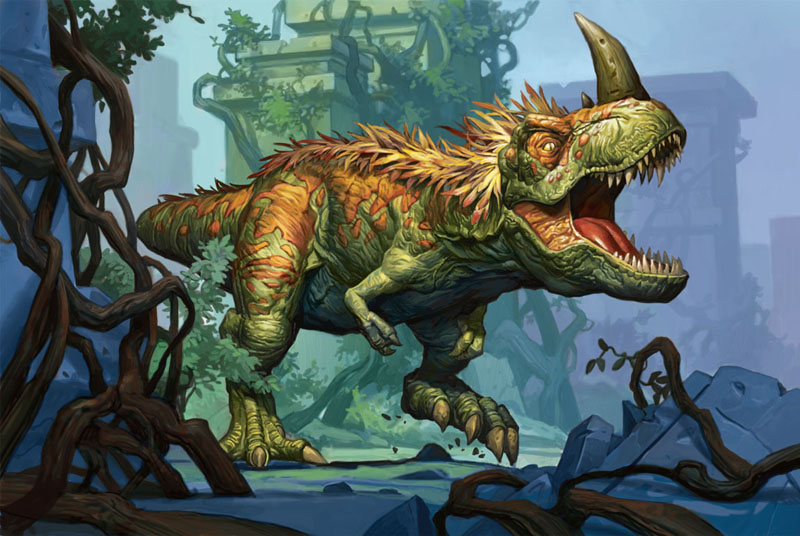
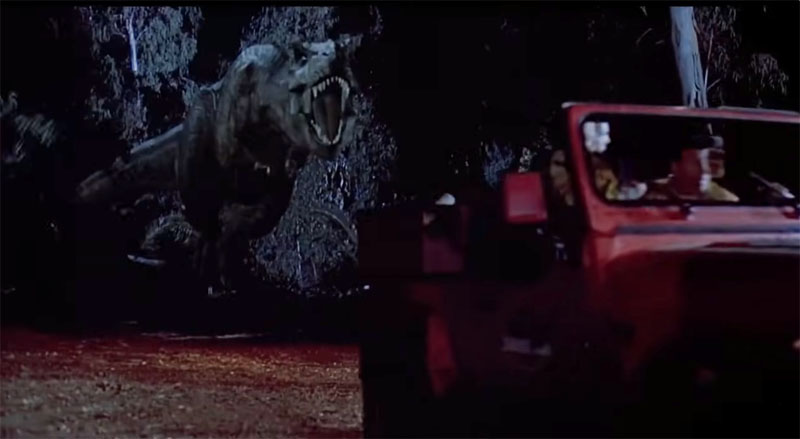
Okay, enough puzzles and traps. Time for a big fight. When our heroes exited the tunnel, they received the shock of their lives. Standing just outside, like a certain beast in a Jurassic Park movie, breathing heavy and seemingly waiting for our heroes to notice it, is an enormous Tyrannosaur Rex. And this isn’t just any old T-Rex. This one has the glazed eyes and rotting flesh of the undead and it looks like there is a zombie crawling around in his mouth. At least this undead dinosaur still has manners. It waited until its prey noticed it, then charged in to attack. Roll initiative.
I first introduced this behemoth just a few weeks ago, back in Session 36. I had it stomping around in the background when our heroes had their uncomfortable dinner with Ras Nsi. At the time, they wanted nothing to do with this terrifying T-Rex and it was a deciding factor as to whether or not to attack their hated enemy. That and the fact that Ras Nsi had kidnapped the beloved NPC Bucketboy and threatened to kill him probably held the players back as well. I figured my players would be itching to take a crack at this beast when he wasn’t surrounded by his Yuan-ti homies. I still expected it to be a challenging fight and I even anticipated that my group would have to retreat which would lead to another cool encounter and maybe even fulfill one of my prophesies that I hinted at way back in Session 22.

I was right about one thing. With just one extra level of XP, my players were no longer afraid of this undead dinosaur and wanted to destroy this thing. They didn’t even retreat into the safety of the cave to think of a strategy. They just ran at it and attacked it head on. It was a tremendous battle but my zombie tyrannosaur never stood a chance.
The Zombie Tyrannosaur has this one awesome ability to spew zombies out of its mouth and spit them at my players. I was chucking zombies at them left and right and it did not matter. Our group cut through them like tissue paper. It did not help that since it was the end of the session, my players held nothing back and decimated this previously deceased dinosaur. I think I was able to land just a single bite on my players before this most terrible of terrible lizards lay dead once more. They barely had a chance to marvel at my terrifying mini, which was just a dino toy that I zombified with a new paint job. By the way, during the battle they used an area effect spell that caught the obelisk in the blast radius, and if that had been destroyed, we would be having a whole different set of impossible problems (see below). Another missed opportunity. To kill my friends. Or rather, try and kill my friends; I can’t seem to kill any of them these days.
Don’t get me wrong. The fight was fun and of satisfying length, but man, I though this guy would put up more of a fight. At least, I did get one good “screw you” at the end when four more zombies burst out of the desiccated corpse of the twice-dead dino. But I never even got to use my cool prophesies to lead them to an even cooler encounter. So. let’s take a look a what I intended to happen. During that previous fortune telling session, one of the prophesies they got said, “When all hope is lost, look to the birch tree for salvation.” This line is ridiculous of course, because birch trees don’t grow in the jungle. I’ve been trying to find a way to put this phrase to use, and I figured I could use it here.
After I kicked our heroes’ butts with my zombie T-rex for a while, the group would have to run away like good little cowards. Of course, no one can outrun a T-rex for long. As they crashed through the jungle trees, one of the party would see a very out of place birch tree through the foliage. Whether they remembered the prophesy or not, they would probably head toward this tree just because it is so unusual. Then they’d see another one, and then another, A trail of birch trees would lead them to the amphitheater at Location 13 with the enraged zomibe tyrannosaur hot on their heels. Praying for salvation, in the amphitheater they would come face to face with an even bigger T-rex, the mythical King of Feathers.
The King of Feathers is the true to his royal name. Twice the size of the zombie T-rex, this thing is immense with a beautiful plume of feathers on its crown and down its back like a regal robe. I have hinted to the existence of this dinosaur before and here it is in all its glory, blocking the path while the another hungry dinosaur is bearing down upon them. They were truly trapped now. I would let this moment of impending doom hang for as long as I could. But like all good Jurassic Park movies, as soon as the two apex predators see each other, they ignore all the puny human below them and charge at each other. Presumably, our heroes would make their escape while this epic duel of the dinosaurs rages behind them. And a prophesy I wrote months ago would finally come true. I’m a genius!
Except I’m not, because this epic moment never occurred, because my stupid players are too damn good. Curse them all. But I wanna do the King of Feathers! Okay, let’s do this. After our heroes kill the four Screw You zombies, they are feeling pretty proud of themselves. They just killed a very scary zombie tyrannosaur, they didn’t die, and they didn’t break the obelisk so they don’t have to fight the demon trapped inside. (Don’t ask. It’s a whole weird thing, Check out Jorphdan’s conspiracy video about it).

So, our heroes are milling about looking for loot and re-reading the carvings when they suddenly feel that they are being watched. Turning around, an even bigger dinosaur (Feather King, baby!) is staring at these puny mortals waiting to be noticed just like the last one. The dinos in these parts sure are very polite. The King of Feathers bellows a deafening roar. Since our heroes just spent all their resources killing the last dinosaur, the realization sinks in that they are actually really screwed right now. This new T-rex stomps toward our heroes, bends down to look at them, and… uses its massive jaws to pick up the just killed zombie tyrannosaur like a rag doll and fades back into the jungle with its dinner. Now, Roland happened to be the one who got the killing blow on the zombie T-rex. As the King of Feathers exits to eat his meal, Roland would swear that this giant dinosaur just winked at him as if to say, “Thanks, I’ll take it from here.” What the hell was that all about? Maybe we’ll find out next week.

Nope. Next week, we search for the final cubes, go to war with the red wizards and get “captured” by the Yuan-ti. Again.
As always, every puzzle can be improved with a handout, so go get those scissors and Game On!
Faster! Must go faster. – Dr. Ian Malcolm. Wisest words ever spoken for negotiating with dinosaurs.
Don’t forget to check out my Tomb of Annihilation Resources Page, filled with all the stuff I use to make this epic campaign even more epicier: My full Campaign Diary, plus Handouts, Maps, Charts, PDFs, Images, and more to use, abuse, or ignore at your peril. All the templates and instructions for my Trickster Cubes are found here as well.
And written specifically for this adventure, read my Explorer’s Guide to Chult to delve into all the legends, lore, history, religion, and culture that I used to bring even more life to this adventure.


Hooray! They found Orvex! And dinosaurs. Ijin’s shrine is definitely my favourite, what with the puzzle floor. Interesting that they four the Yellow Banner handout, it’s definitely the most confusing in the book (except for Acererak’s Warnings, but those are deliberately confusing. The letter is just illegible). I wonder what will happen when they are captured again… this will be interesting.
LikeLike
This has come just in time – my party will reach Ijin’s shrine next week, and I hadn’t twigged that the puzzle floor was flawed. Thanks for this.
Also, I have been “inspired” by some of your additions and twists in the past, but now I’m just going to outright steal your kobolds, and the song. I’ll credit you later, when its too late for them to get spoilers from you blog. Thanks again.
Mike.
LikeLiked by 1 person
You’re welcome. My middle name is Justintime. Thanks for the love and never apologize for your petty larceny. My stuff is meant to be borrowed, amended and outright stolen. Enjoy! BTW did you end up using my template for the puzzle cubes? I wondering if anyone has used them.
LikeLike
Sadly I’d already made my cubes before I saw your template. I had a piece of 1×1 timber so I cut nine 1inch cubes from that and some grey paint and decoupage finished them off. This was more work than it needed to be.
LikeLiked by 1 person
I bet they look great though. I love it!
LikeLike
I can’t wait to see the battle with the Red Wizards! It should be very exciting. This group seems to have a knack for being captured. By everyone. Very excited for Tomb 39 and Strahd! Go Thames!
LikeLiked by 1 person
I love that Thames has a fan club.
LikeLike
It’s me again. The same person who said that Thames was their favourite way back in Tomb 36. And the guy talking about WPM. And Strahd. And Rime of the Frostmaiden. I’ve been here this whole time! Mwa-ha-ha. Also, I really love the kobolds. Definitely the cutest things in the Monster Manual (although the grungs would kill me if they heard this). And the song is hilarious. Nice of WOTC to answer that age old question: who is fixing the traps? Well, now we know.
LikeLiked by 1 person
First off, I claim copyright on the song, but I offer free-use on any using it in your game. But seriously, I’m excited for the the next 15+ posts. Red wizards, Ras Nsi, a mysterious disappearance, new players, terrible new obligations, insane Tomb Shenanigans, Party betrayals, a new nemesis who hates the party more than life itself, some great new minis, implausible escapes, death door bargains, noble sacrifices, a terrible curse, and a reveal 2 years in the making.
And then there’s Strahd which is insane from the start and goes completely, gloriously chaotic by Session 5. I wish I could write faster.
LikeLike
I saw a comment cheering for Thames and honestly, I have to join the rapport. Thames fan club starts today!
LikeLiked by 1 person
Wes is gonna be thrilled to have he own fan club. I’m texting him right now. And if you think he’s a hero now, just wait til the end of the campaign.
LikeLiked by 1 person
Yay! So excited! Btw I love pretty much any characters that are tieflings, artificers, rogues, rangers, bards, etc…. Basically, anyone with high dex. 🙂 Definitely loved Miche, and now I support Thames and Martic. Gwen and Roland Just Roland are still amazing, though.
LikeLiked by 1 person
I was sad to see Miche drop out of the campaign too. And Scath as well. I had some neat ideas for them both and it would have been interesting to see how the story developed had they stayed with the group. There is a monk in the Strahd adventure, so you got that to look forward to.
LikeLike
Go Thames. The only reptile on this continent that wont try to bite your face off.
LikeLiked by 2 people
He may, however, accidentally on purpose try to steal the Ring of Winter for the war in Sideria.
LikeLiked by 1 person
Old Thames would totally steal that ring. And you will be shocked at the fate of the ring by the end of the adventure.
LikeLike
I can’t believe I haven’t found this journal before! I’m in the midst of an off-the-rails ToA campaign and I love the creativity you approach the various aspects of the story with. My PCs are about to invade Jahaka Bay, although they’ve got it in their heads to recruit a certain young red dragon to their cause…
LikeLiked by 1 person
I can’t believe you haven’t found it before either. But I’m glad you found it before it was too late. And the best campaigns are off the rails or even no rails. Good luck with the dragon requirement. Keep me posted and welcome aboard the Chult Crazy Train. Next destination: FUN!
LikeLike