
In the Tomb, we meet the maintenance crew, a cat and a snake form an unlikely bond, we abuse a spell, and Seppi dies. Again.
When last we left our heroes, after years of adventure, we finally entered the Tomb of the Nine Gods (really, just Tomb of Horrors, version 5.0). After losing Roland to college, we picked up a new addition to the roster when Bag of Nails was upgraded from NPC status to full-blown Player Character as Andrew joins the campaign. We also picked up some unwanted baggage in the form of Savash, a Yuan-ti that the party was forced to take with them as part of the deal they made to kill Ras Nsi.
It took forever and they almost died to find the right entrance and get inside. Once they did get inside, Bag of Nails took over the show as he tried to take on the entire first level by himself. And he almost succeeded. He blew through every trap, demolished a shadow demon on his own turf, and took on six wights by himself. He was a one-man army that took ridiculous chances, yet always managed to come out of top. That is, until he found the first of nine Trickster God treasures. This one boosted his defense (not that he needed it) but it also merged his soul with the spirit of Obo’laka. Fortunately, Obo’laka is nervous, timid, and afraid of his own shadow. Hopefully, this will calm Bag of Nails down a little bit, and he won’t get murdered by his own companions.
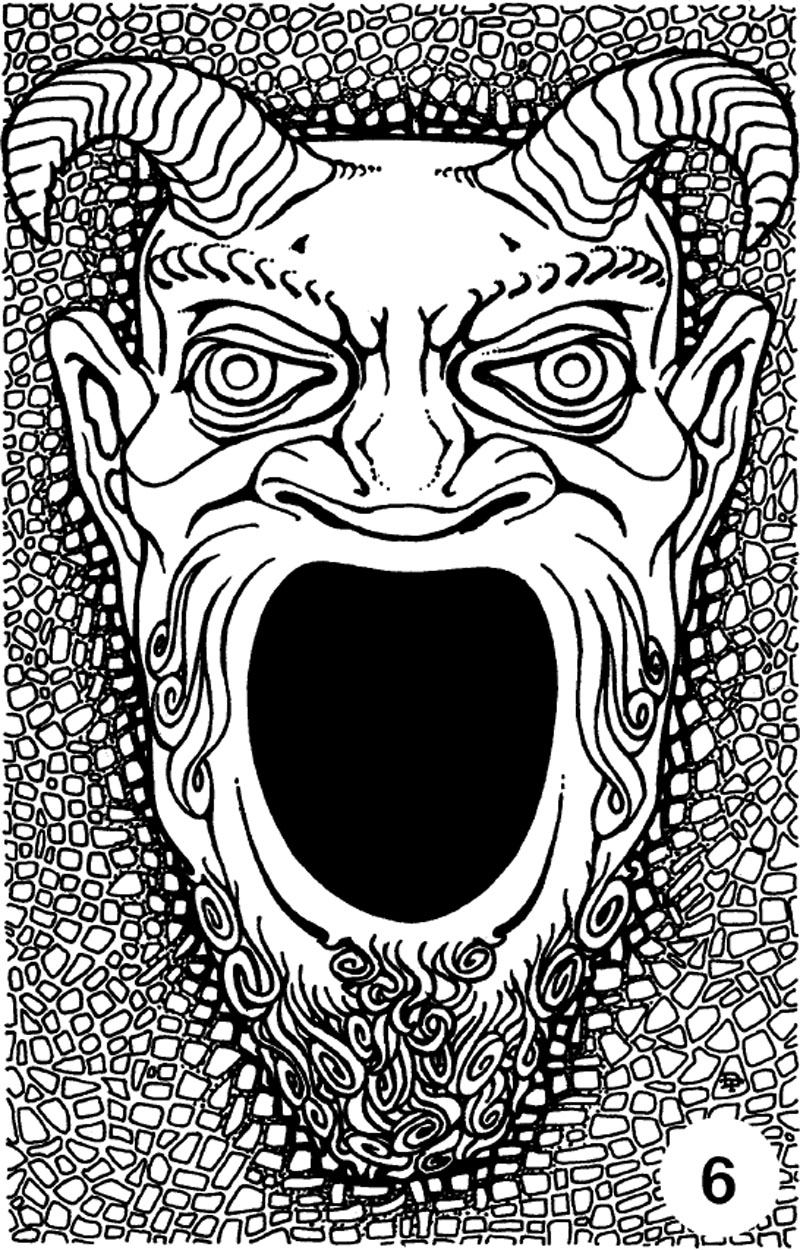
Our heroes had managed to clear just two rooms of the tomb and they were already beat up badly. They need to take a short rest and decided that the best place would be in the very Great Green Devil Face statue that destroyed countless heroes in the OG Tomb of Horrors. But here in the kinder, softer 5th edition tomb, the Devil Face is the sensory deprivation tank of the now dead shadow demon. It’s the perfect spot to hole up, literally. They crawled inside the gaping maw of this iconic menace and had the most restful nap of the entire campaign.
As our heroes crawled out of the Devil Face, they immediately noticed something was wrong. When they entered the hole, they left the corpse of a Tomb Guardian lying on the floor after our heroes killed it. But now the rotted corpse was nowhere to be found. It was gone. Also, the shattered glass of a giant window that our heroes smashed had been cleaned up and the window had been replaced. What’s going on here? Have they entered some altered reality? Is everything an illusion? Does the Tomb repair itself? Nope. This is just the first sign of the TDMD; the Tomb Dwarf Maintenance Department.
One of the more meta complaints of every deathtrap dungeon is, who keeps resetting all these traps? It’s not like Acererak grabs his toolbox to recoil every sprung spring and re-poison every spiked pit. Most DMs say the answer is “Magic”, when the real answer is “Shut up, don’t worry about it.” But this tomb goes above and beyond to answer this age-old question. A crew of slaves was used to build this dungeon. Acererak murdered them, turned them all into undead, and gave them the job of fixing this tomb for eternity.
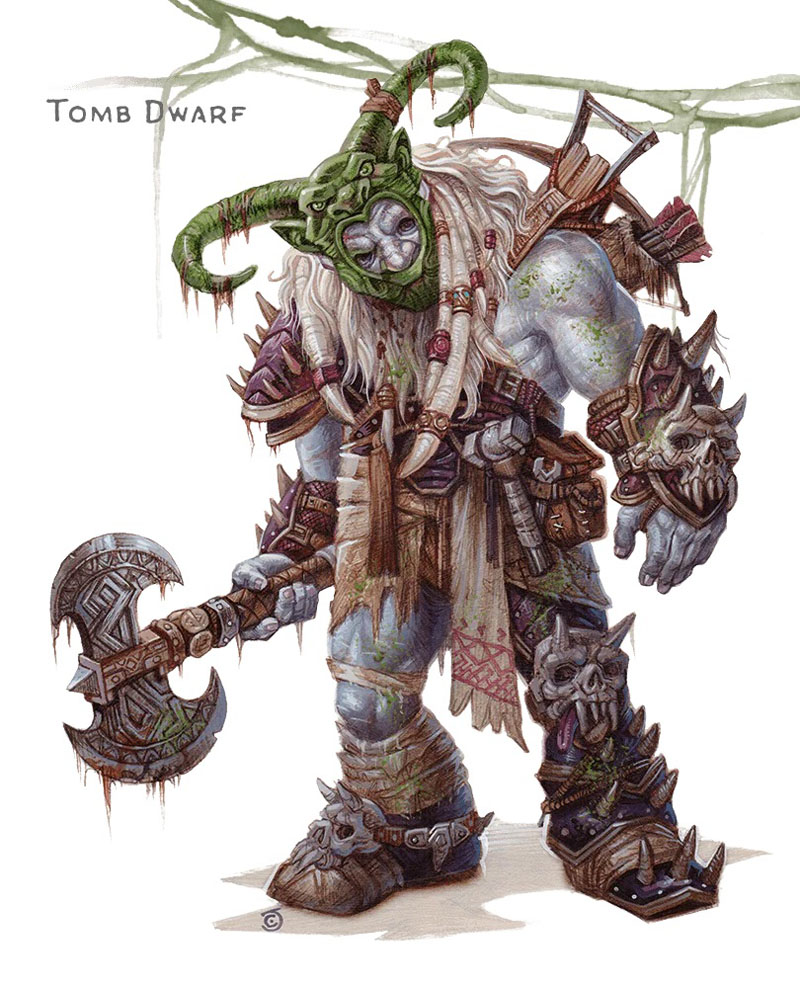
Your job is to make your players aware that this maintenance crew exists and is constantly active within the dungeon. The best way to do this is like I just did. Every time you players trash a room or dismantle a trap, if they leave for an hour or more and come back to the same area, then everything has been fixed. This will freak out your players as they try to figure out what is happening. They will begin to test the limits on what resets a room. They might close the door and immediately reopen it to see if it resets, or they might wait a few minutes in the hall before doing this. Shoiuld they do this, I would send in a tomb guardian that is wearing a literal sign that reads, “Quit stalling. Move it along.” This will freak out your group even more when they realize that they are being watched.
As they wander through the dungeon, your heroes may catch glimpses of strange figures that always seem to vanish before they get to them such as in area 7A. They might hear a snippet of song echoing down the halls sung to the tune of Heigh ho by the seven dwarfs. “We work, we work, our job we must not shirk. We fix the tomb until our doom, we work, we work. Acererak wants a million souls, until that time we’ll do as told. Withers is a slimy git, that bastard can eat my … We work, we work…” But do not overplay these clues. The Tomb Dwarves work only when the players are not around and do their best to not be discovered.

One exception to my dungeon repairs, is that if your party trashes a room a second time, like mine do later today, then it is not quickly repaired. This will confuse your players even further, since the expected response does not happen. My reasoning comes from Area 19 – the alternate tomb. The book says this extra tomb is the testing ground for Acererak’s traps. Instead, I use it as a warehouse to replace anything broken in the real tomb. If the players smash the glass and kill the undead in Area 10, then the dwarves go to the alternate Room 10, grab what they need and install it back in the real tomb. But if it is broken again, then there is nothing to replace it with until Acererak shows up and magically restocks everything. Have fun with this. It is an amusing bit of whimsy in an otherwise deadly dungeon.
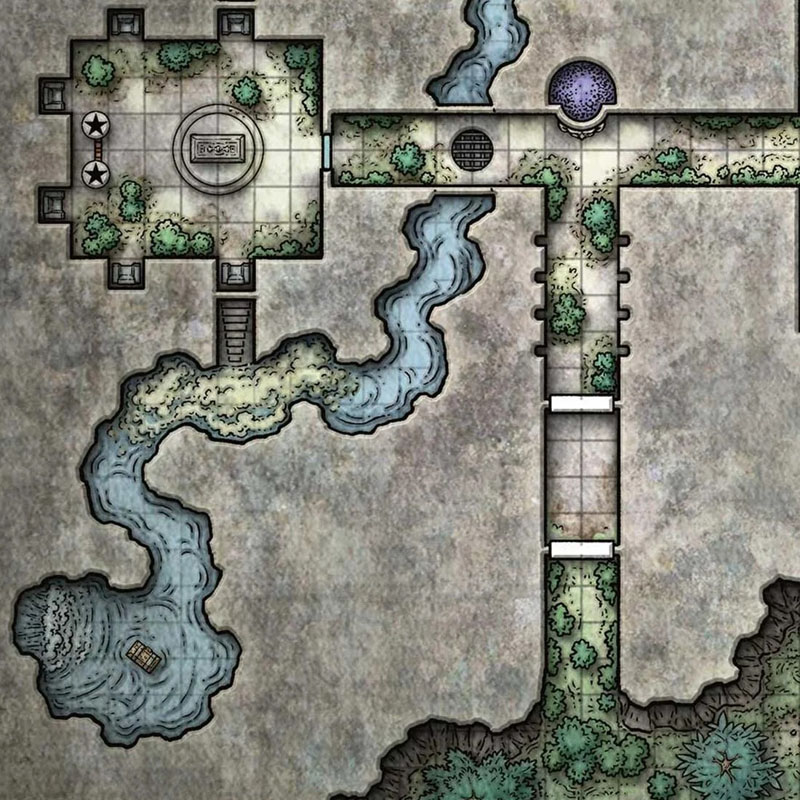
Moving on, our heroes enter the grand staircase (Area 7), where they catch their first glimpse of one of these tomb dwarves. They start to run after it, but then stop, fearing a trap, and continue back up to the first floor. They investigate the stone skull with a tomb on the other side (Area 13), but they can’t figure out the trap. They ignore this area and move on to Area 15/16 with the Fan blade trap and Wongos’ tomb. Since the Tomb is so compartmentalized, when we enter a new room, I will first mention any changes I did to the room and then tell the story of how my players beat it.
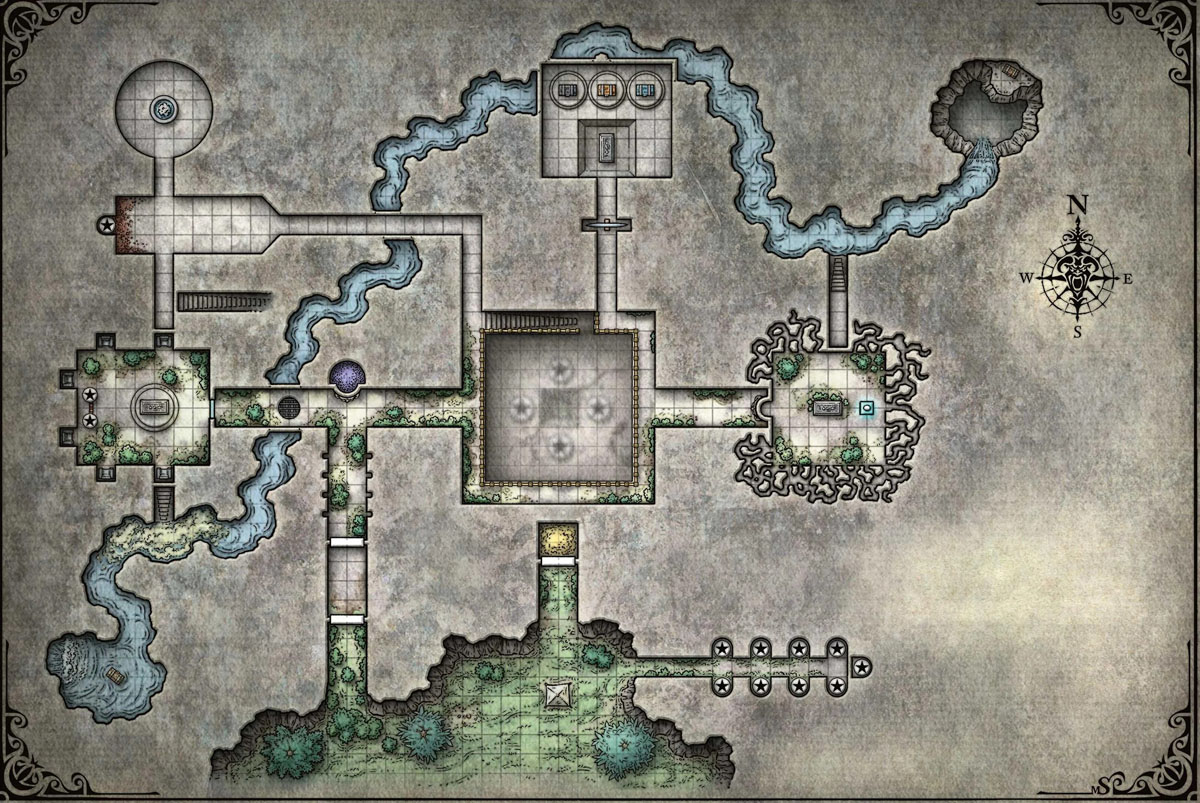
Area 15/16 Wongo’s Tomb – I did not make any changes to the fan blade trap. In Wongo’s Tomb the only change I made was that after the three buttons are pushed within the locked chests, the chests remain locked until the round after Wongo is released. This will force any players outside the chests to contend with Wongo by themselves for at least one round. After that the chests unlock, the still living heroes inside can spend half their movement getting out of the chest and resume combat normally.
In the fan blade hallway, my group easily found the floor trap, guessed it was attached to the giant fan blades and circumvented the whole thing using Bag of Nails’ special ability. Spider climb will solve a ridiculous number of problems within the tomb. Something I’m sure the writers never considered since Tomb of Annihilation came out before the Tabaxi became a playable race in D&D. And don’t get me started on the Aarakocra. Bag of Nails clings to the walls carrying a rope that the rest of the group ties off to the railing in the grand staircase. Bag crawled through the blades, into Wongo’s tomb, and tied off the other end to the central chest. The rest shimmied along the rope easily and into the room. Yeah, there was an athletics check, but even Gwen passed.

Thanks to Acererak’s warning, they figured it out the room pretty quick, and now that crazy Bag of Nails is possessed by the spirit of timid Obo’laka, for the first time, they all worked together to solve it. From Acererak’s warning, they realized that one person would have to squeeze inside each of the three trunks and turn a key to unlock the sarcophagus. They even guessed the nature of each trap within the chests. Thames the silver dragborn, who just so happens to be resistant to cold damage, climbed inside the silver trunk. Martic took off every scrap of metal he was wearing and entered the rusty chest with a single copper piece. They could not figure out the damage type of the black chest, so they sacrificed Thames’ griffon homunculus, Seppi, to face this unknown fate. How exactly does a griffon turn a key? Don’t ask questions.
Our heroes really chose wisely on this trap. Thames made his save and only took quarter damage (11 hp) in the cold box. The copper piece rusted to dust but Martic escaped unscathed. Poor Seppi failed his save and was obliterated by force damage to the tune of 75 hit points, turning the sacrificial robot into dust. For those keeping count, this was Seppi number 3, and Thames is all out of large gems. Poor Thames is gonna have to carry around his own cannon until I decide to put another gem in some random treasure horde.
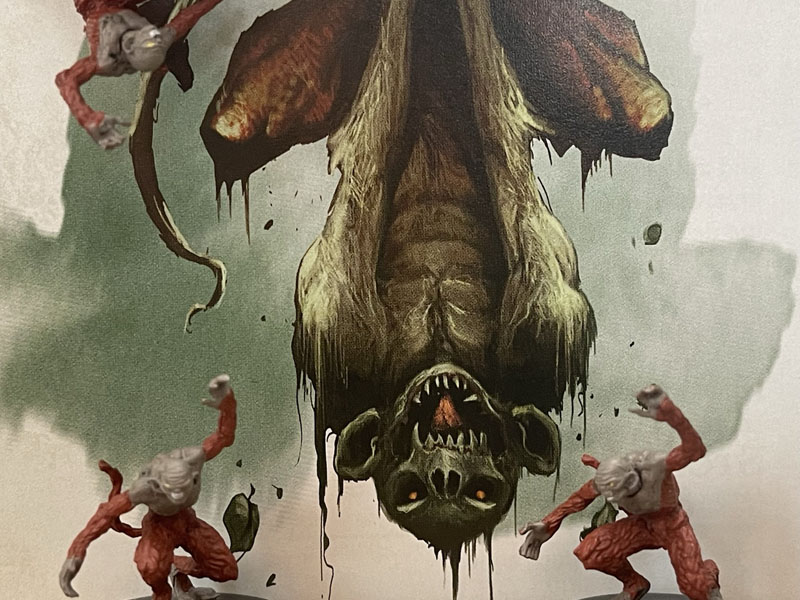
After that, all that was left was to smash the now crystalized coffin and release Wongo. I like this trap more than others, because this Trickster God is still an active part of his tomb. Most of the Gods have been turned to dust or bones by this time. But in this tomb, Wongo the su-monster is still here and he’s been turned into a mummy that our heroes must defeat in combat. Oddly, he wields a legendary magic item in his hands that is completely redundant for this monster. It is a mace of terror used to instill fear that is identical with the mummy’s dreadful gaze ability.
Martic and Thames are still trapped in their chests. Savash the Yuan-ti refused to even enter the hall because he is only here to get the Black Opal Crown and not foolishly risk his life exploring every stupid room. This left Gwen and Bag of Nails alone in the tomb to deal with the mummy su-monster. Wongo’s first action was to use his dreadful glare. Gwen passed her save to overcome the effect, but Bag of Nails rolled a Nat 1. Clearly, his possession by the cowardly Obo’laka affected his roll. Bag fled down the hall, through the blade trap, activating it, severing the rope bridge and splitting the party even further. Bag then jumped into Savash’s arms, Scooby-Doo style, quivering with fear. Savash quickly dropped the scaredy cat, hissing, “Grow a spine you furry duthrael!” It was quite funny and it was the start of a strange bromance between the cat-man and snake-man.

Miraculously, Gwen managed to avoid Wongo’s attacks during the first two rounds. Once Thames and Martic joined the fray, the battle was over before it began, even if it took several rounds to wrap up. A single mummy is no match for an artificer and his OP cannon, a cleric and her Toll the Dead, and even though the ranger was unarmored, he immolated the dry, brittle mummy with his flame tongue sword that he lifted off Ras Nsi’s corpse.
After the battle, no one wanted to touch the possessed mace, except maybe Bag of Nails who was dying to rid himself of Obo’laka’s cowardly influence. But he wasn’t in the room, and could do nothing about it. This is also the start of Thames’ obsession with the mage hand cantrip. He refused to touch anything for the rest of the adventure. Frankly, it got rather annoying. I had to constantly make decisions about whether his endless list of uses for this unlimited cantrip was allowed or not. Time that could have been better spent running the adventure.
I don’t mind the spell itself; it is a unique solution to a problem. But when it becomes a crutch, it ruins the spirit of the game. In my future campaigns, this will always be a first level spell. You can still use it, but it will cost you a valuable spell slot. Unaware of the abuse to come, I allowed Thames to use mage hand to shove the mace in his magic bag. Then once Bag of Nails calmed down they repeated the wall climb / rope trick to get past the blades and move on to:
Area 8/9 – I made no changes to either area here, but I did add an encounter and made a mistake during the course of it. Area 8 is yet another metal destroying trap and I never understood the appeal of this trap. I really like the use of it in Wongo’s tomb. There it only affects one player, and if that player loses all their armor and weapons, it creates a scenario where the rest of the players need to pool their equipment until replacements can be found. That’s fun and interesting. Clearly the writers thought, since that worked so good, let’s make this Hallway one even worse and possibly cripple the entire party just for kicks.
Fortunately, our group saw the ubiquitous “rusted metal” on the floor and knew the deal. They threw another copper piece at it and watched it zoom down the hall (yes, I know copper is not magnetic) slam into the statue’s shield and disintegrate. Once again, everyone took off their armor and stuffed it in Thames sack. They hid their metallic weapons and other equipment too. Except for Bag who refused to removed his studded leather armor and Savash, who removed his armor but kept his scimitars. They both resisted getting yanked toward the statue, marking the perimeter of the effect. Everyone else was reduced to clubs, whips, staffs, and a spear with the pointy metal part broken off. Once again, they sent Martic, who was practically naked, to go solve this puzzle.
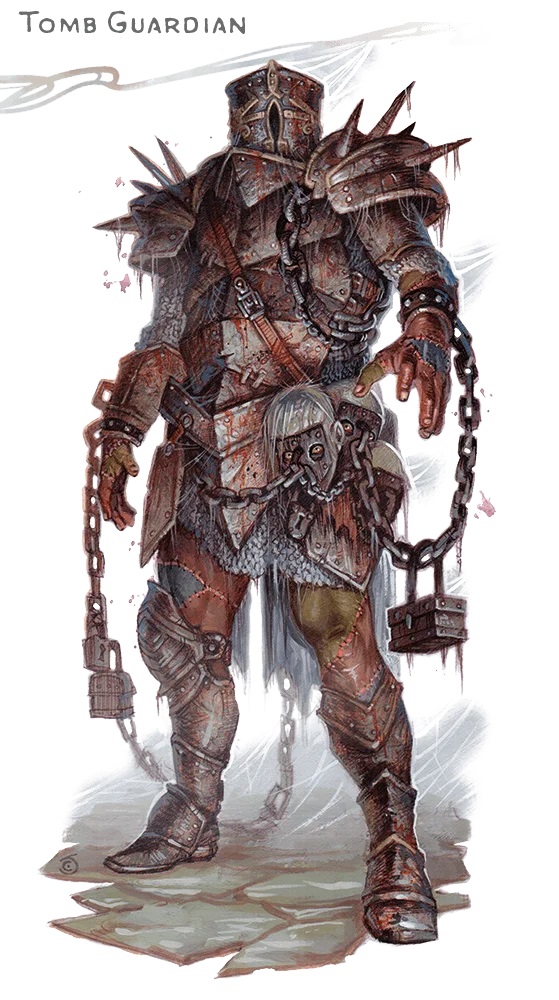
With the party split up and only partially armored, now was the perfect time to throw another annoying Tomb Guardian their way. This time, the golem is wearing a suit of brass armor, another non-magnetic metal, and began tearing through the rear of the party. The Guardian tried to push the party into the magnetic room, but Bag of Nails was able to use his climb wall ability to get on the other side of the golem and lead it back toward the grand staircase.
Meanwhile Martic ran down the magnetized hall, and thought to cover the shield with his canvas tent. Martic tested it with another copper coin (they’re gonna run out of money at this rate) and learned that the shield is turned off. My mistake is that while the tent would block against the corrosive property of the shield, it would not turn off its magnetic property. Thankfully, this didn’t affect anything significant.
Next, Martic ran back to the group fighting the Guardian and asked if it was near the edge of the railing. I said yes, and Martic attacked deploying a previously unused aspect of his bug swarm. He usually uses this swarm to cause extra damage, but now he used it to shove the Guardian toward the giant drop off in the Grand Staircase. Incredibly the Guardian failed, toppled over the banister, and fell over 100’ feet into the inky void, until they heard a clanging crash below. I hope that killed him. They also heard an abrasive grinding growl and the sound of stone scraping on stone. Our heroes did not stick around to see what came up the stairs after them.
Moving down the now inactive magnetic hallway, they turned right into the Fountain room. This room serves no function except to screw with the players. Drinking from the fountain produces one of four effects and only one of them is marginally beneficial. One effect even has a chance to permanently kill the PC. Like the OG Tomb, this room punishes exploration and curiosity. The only thing I found interesting about the room is that it is the first time that a Trickster God who happens to possess a character gives the character advice about the room.
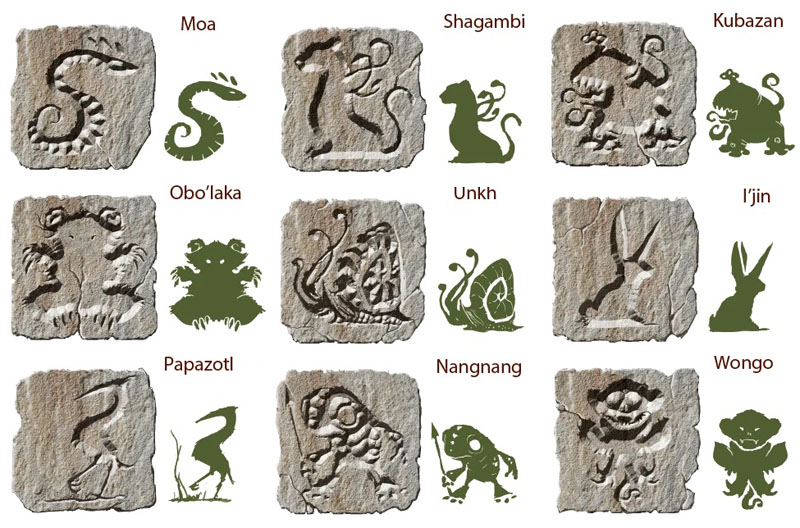
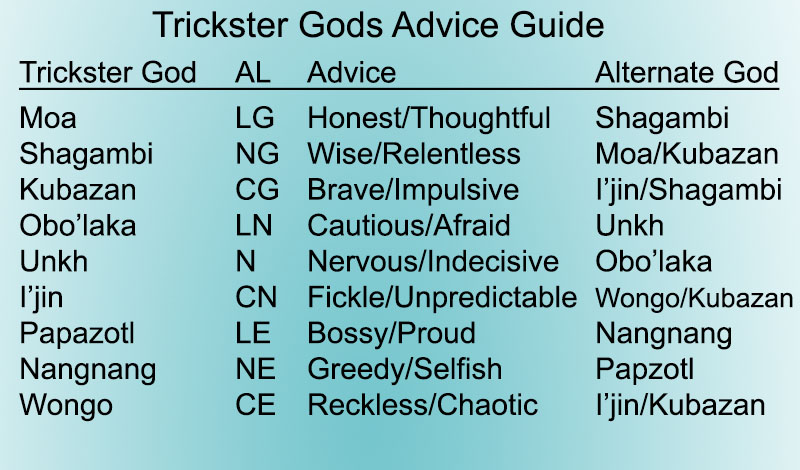
I love this concept. It is a good way to offer a tip about a specific room or trap, without it seeming to come straight from the DM looking to “take it easy” on the players. I also like that not all the advice is useful and could be potentially fatal, based upon the nature of the Trickster God giving the advice. Just another element that rewards players who pay attention. Whenever a Trickster Gods gives a piece of advice, I would text the player with the message. For instance, here Andrew got a text that read, “The spirit of Obo’laka cautions you not to drink from the fountain.” This way it doesn’t interrupt the flow of the game, and doesn’t tip off the others players as it would if you passed a note to the player. Although, by the time we got to Level 3, anytime a player checked his phone, the others players would all ask, “So, what’s your god have to say?”
One issue with this brilliant bit of roleplay is that for each area that offers a Trickster God advice, the book only gives two or three options of such advice. Granted, it is impractical to list every possible piece of advice from every possible Trickster on every single trap. And you don’t even want for every player to get a personal clue for every trap. Receiving a clue should be rare and special, not commonplace. The best scenario is for two players to each get a bit of advice that is wildly opposed. For example here at the fountain, cautious Obo’laka say to not drink, but reckless Wongo says to drink up.
But there are numerous times, when none of your players are possessed by any relevant spirits. And in my game, one player flat out refused to ever touch a Trickster artifact, limiting our chances even further. That’s just the luck of the draw, yet sometimes you want to give advice, both helpful and conflicting, but have no options to do so. If there is a point in which you want to give advice that isn’t written in the book, below is a quick reference about what kind of advice each Trickster God would give and an alternate god whose advice you could substitute in a pinch. For example, if a player is possessed by Shagambi, you could use advice given by either thoughtful Moa or brave Kubazan if either apply..
In our game, Bag of Nails shared what his god just told him and no one drank from the fountain. They did fill one of their water skins with fountain water and marked it with a blue ribbon. I had a whole plan that Savash would switch the water skins, in case I needed to inject a little more chaos into the dungeon. Sadly, we got so busy with everything else that this moment never came to pass, and this entire fountain water trap became just another forgotten side plot. I never even rolled to see which effect it would have been. Before leaving, Gwen tossed a copper into the fountain and made a wish that “the Death Curse would end.” You just wasted a coin, ’cause Acererak don’t grant wishes.
Taking a left in the magnetic statue room, our heroes reached a dead end but find the secret door leading back into Obo’laka’s Tomb. I removed the other secret door leading to Wither’s private room on the second level. I don’t want them going there yet. Everything that Bag of Nails did in this room last session has been fixed. Six new undead sit in the throne, each one wearing a mask even though Bag still has the one he collected previously. The sarcophagus is resealed and the smashed window leading to the main hall had been repaired.
Still masked, Bag of Nails collected the rest of the masks so the entire party could avoid setting off the ocular trap within the room. They reopened the coffin to find that the bones were still there, but a second ring of protection was not. Apparently, those are unique items and don’t get replaced. I vaguely remember putting a place holder card in the coffin that read: “Item in use elsewhere. Check again, later.” I’m very meta. Then to test out the regenerative properties of the dungeon, they murdered all these new undead wights and smashed out the window a second time. They found the secret door that leads to the explosive trap found by Martic last session, and chose not to open the door. Instead, they crawled out of the window and back into the very same hallway with the same Green Devil Face where they started this session at.
I was prepared to run the rest of the first level, including Moa’s Tomb and all the stuff in the out of place sewer that ran just below this level, but no one wanted to investigate these areas. They all voted to proceed to the Second Level and we ended the session early to give me time to prepare. We hadn’t accomplished much, and literally ended exactly where we began, but that’s okay. Now that we were no longer in a real-world time crunch to get into the Tomb, I’m glad that everyone would rather take their time and explore this unique over-the-top dungeon.
Next week, we discover the tomb’s warehouse, learn more about the Yellow Banner, and drown our sorrows in a vat of wine.
As always, some days it just feels like you’re going around in circles. Get your protractors and Game On!
This is bullshit! – Seppi’s response to being ordered into the unknown death box.
Don’t forget to check out my Tomb of Annihilation Resources Page, filled with all the stuff I use to make this epic campaign even more epicier: My full Campaign Diary, plus Handouts, Maps, Charts, PDFs, Images, and more to use, abuse, or ignore at your peril. All the templates and instructions for my Trickster Cubes are found here as well.
And written specifically for this adventure, read my Explorer’s Guide to Chult to delve into all the legends, lore, history, religion, and culture that I used to bring even more life to this adventure.


Ah, so they triggered the wine trap? One of my favourite parts of the 2nd level.
LikeLiked by 1 person
Incredibly they triggered it on purpose. Twice! Bag of Nails really needed to refill his wine flask.
LikeLike
Wow. Once is an accident, twice is dedication. What were they trying to do with it? Oh wait, the resetting from the dwarves?
LikeLiked by 1 person
You guessed it. They spent so much time trying to figure out the tomb. And the second time despite their precautions was the one that almost killed them
LikeLike