
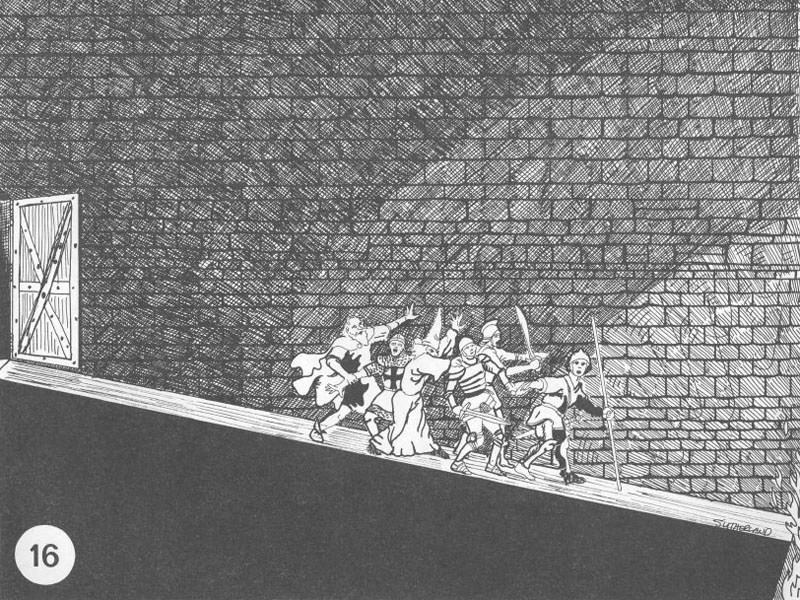
Iconic gargoyles punish our penny-pinching party, and one hero maims himself to beat an unbeatable foe.
When last we left or heroes, they finally wrapped up all the silly tombs, traps, and trials on the third level. They have collected all of the Trickster God magic items from levels 1-3, and been possessed by several of them. They even collected the skeleton key on this level and found ten strange little crystals that have been scattered all over the area. Oh, and Gwen is dead.
No, not the real Gwen. A doppelgänger named Pox had waylaid Gwen and assumed her place in the group to try and escape the dungeon. Things didn’t work out for the shapeshifter and he lies dead on the first floor in front of the iconic Green Devil Face that our heroes have used as a safe place to rest for several sessions. Also currently in the same place is the eviscerated body of a grey slaad our heroes once tried to capture. (It’s a long story.) It appears that the slaad was spit out of the Devil Face like a sausage through a meat grinder and our heroes vow to never use the Devil Face as a cheap motel ever again.
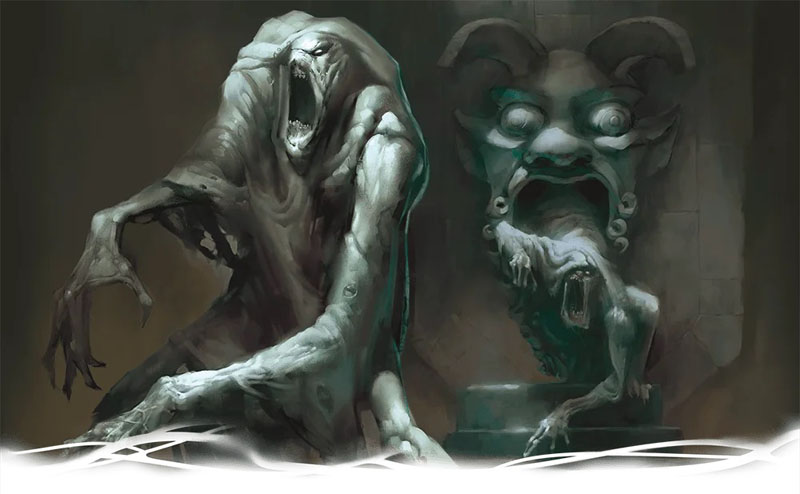
At the end of the session, our heroes used the crystals to open the door that led to the lair of the final boss of the level. With all the clues presented before, it was no surprise that the final boss was a beholder, the classic D&D monster with one giant floating eyeball, massive, gnashing teeth and ten eye stalks that shoot a variety of lethal death rays. What was surprising was that this beholder is permanently invisible, plus the room has a giant magnet trap that screws with everyone using metal armor and weapons and has an impossibly frictionless floor that makes it impossible to stand and screws with everybody else.
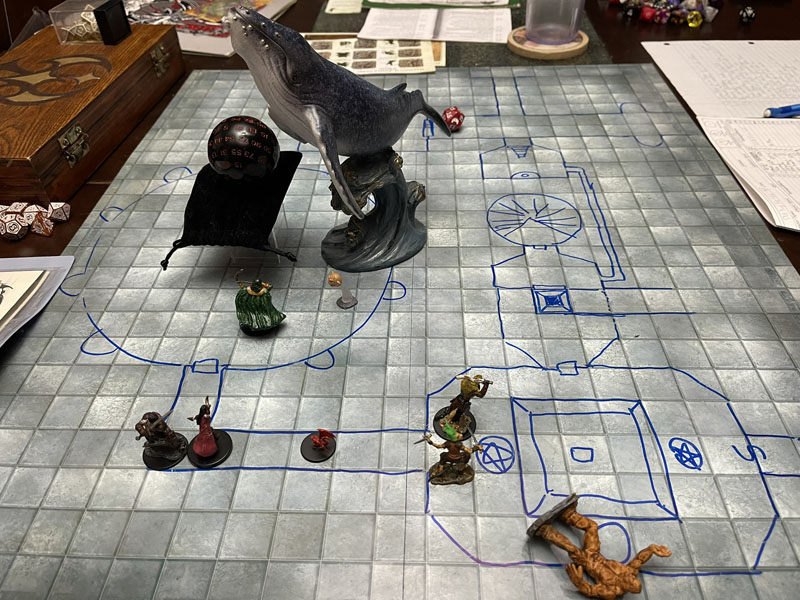
Our heroes barged into the room without a plan and needless to say, they got the crap kicked out of them. Grum was dying, and half of the party was incapacitated. They only survived thanks to a brilliant use of Thames’ artificer cannon and the sudden appearance of a gigantic blue whale. (Another long story.) But they escaped and need to find a new place to hole up and lick their wounds.
Now despite the fact that this beholder is totally irrelevant to the story or the mission to stop the Death Curse, our heroes are determined to take this obnoxious gas bag down. The first order of business is sleep. Where can they go that’s safe? The book has graciously provided a safe room in Area 36 Chamber of Respite. It’s an empty room in a maintenance hallway that is conveniently forgotten. Our heroes have been here before, but they were suspicious of it and figured it to be a trap. It’s not. Fortunately, our heroes remembered this room and decided it was the best option they had. They cast alarm on the entrance and took a nap.
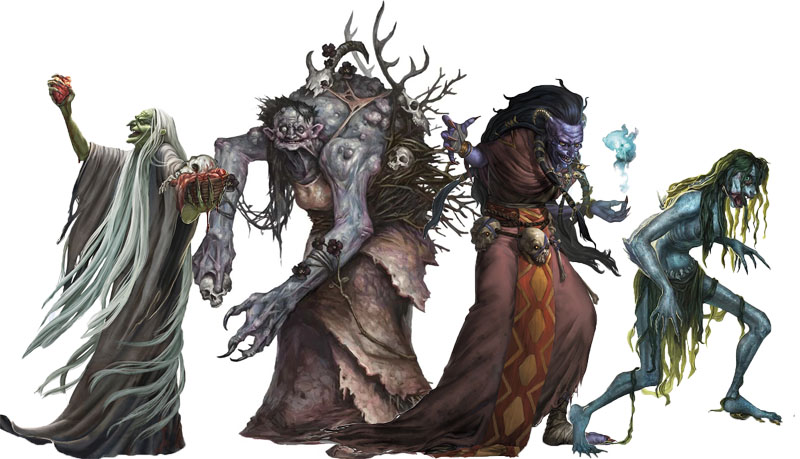
Unfortunately, the alarm spell does not affect creatures in the ethereal plane, like hags. Hags play a big role here in Tomb of the Nine Gods, but you’d be forgiven for not knowing that since they barely receive any mention until the heroes enter their room at the end of the dungeon. I have tried to make these hags a more visceral part of the story. My heroes first learned about these Tomb hags in Session 21, when they found a coded letter written by one of the hags and sent to a different set of sea hags. (There is a surprising amount of hags in this adventure.)
A few sessions later, they suffered some nightmares fueled by these same Tomb hags, but were unaware that the two things were connected. Well, it’s been a while, and it’s time to reintroduce these witches. As our heroes slept, each one was plagued by another horrific nightmare that played upon their backstory. Thames was attacked by all his dead army buddies. Bag of Nails was forced to relive the day his son was killed by a zombie T-Rex. Gwen’s father succeeded in killing her in some demonic ritual. And Martic, uhm, he drowned in a swamp. Sure, that’ll do. Martic doesn’t have much trauma in his backstory. During each nightmare, some small part of their body was lost; scales were ripped out, hair and fur were pulled out, and blood was spilt.
When they awoke, they realized that these wounds were real. Even the NPCs, Grum and Savash, had suffered the same fates. They also saw that the floor was covered in ants, scurrying everywhere. (This is a flavor feature of one of the hags and was a cool creepy detail to include here.) From a mechanics point of view, this visitation has two penalties. First, the group had healed up to full but minus a single Hit Dice based on their class. For example, Gwen as a cleric rolled a 1d8 so she healed up to full minus 5 hit points. This will make the coming battle just slightly more dangerous and makes these dreams more than just a narrative detail. The second penalty will be revealed later when the players face these hags and will be much more significant.
Prior to the rest, our heroes prepped all the spells and whatnot for the big boss battle with the beholder, but one player went beyond my wildest expectations. The major problem our heroes faced was that the beholder is protected by a permanent invisibility spell. The boss room is huge, and they had no way to target the monstrosity. Martic can cast faerie fire, but that would first require an impossibly lucky roll to cast it in the right area. They needed some way to see the thing beforehand.
Inconceivably and completely unplanned, I had given them the means to do this all the way back in Session 3, but this was not what I ever intended for this subplot. In that session, our heroes rescued a shipwrecked soldier from Baldur’s Gate. He didn’t even have a name at the time or any real idea where his story was going. That soldier had his eyes plucked out by some sea hags. The same hags with that coded letter. Then it wasn’t until Session 23 where our heroes reunited with this soldier and learned that his name was Sir Miles Farsight. (Probably my best pun name ever.)
I created Miles to be a true ally to our heroes and a trusted NPC during the Fort Belaurian and Sea Pirates sub plot. Part of making him an ally was to involve restoring his eyesight. In the aforementioned pirate camp, one of the captains has a glass eye. In the book, this eye is really a gem with the magical ability to “find hidden trails to buried treasure.” Lame. And useless in the adventure since the book don’t include any buried treasure to be found. I made this gem be a gem of true seeing but it can only function when placed inside an empty eye socket. Just like the one Miles Farsight has.
When our heroes vanquished the pirates in Session 34, they were thrilled to have found the gem and the perfect solution to Sir Farsight’s problem. But they never got the chance to deliver it. In real life, we were forced to speed up our timeline and head immediately toward the end stage of the campaign. The gem has sat unused and forgotten on Martic’s inventory sheet. Until now.

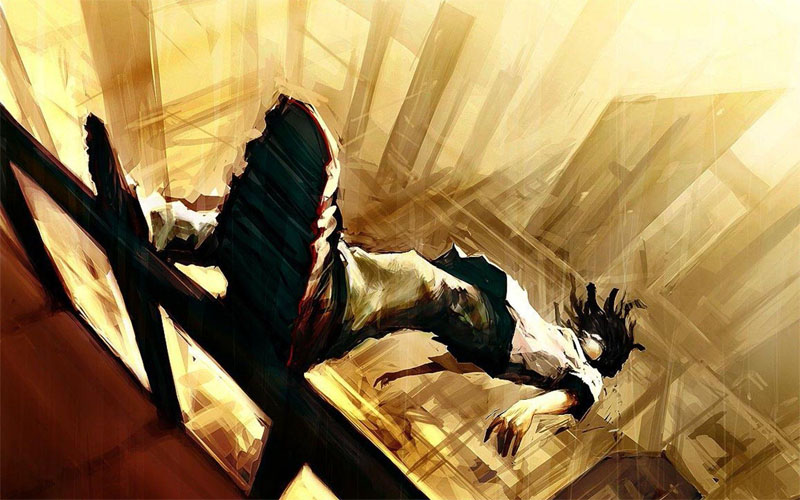
Martic asked if it was possible to pluck out his own eyeball, and then use the gem to heal the wound. Absol-freaking-lutely! What a brilliantly macabre idea. And one that can only exist in the world’s greatest role-playing game. Now kids, I have to warn you: Do Not try this at home. We are professionals. Before the long rest, I had Martic make a DC 15 Strength save, Dexterity save, Wisdom save, and a Constitution save. Four separate saves to see if he had the guts, the agility, the willpower, and the fortitude to pull this off. Everyone wanted to “help” (and apply advantage), so I had them describe how they were helping. As a group, they offered to steady his hand, cast calm emotions and aid, stand by at the ready with healer’s kits and health spells, all while chanting words of inspiration and support. This works for me, Advantage and inspirations for everyone!
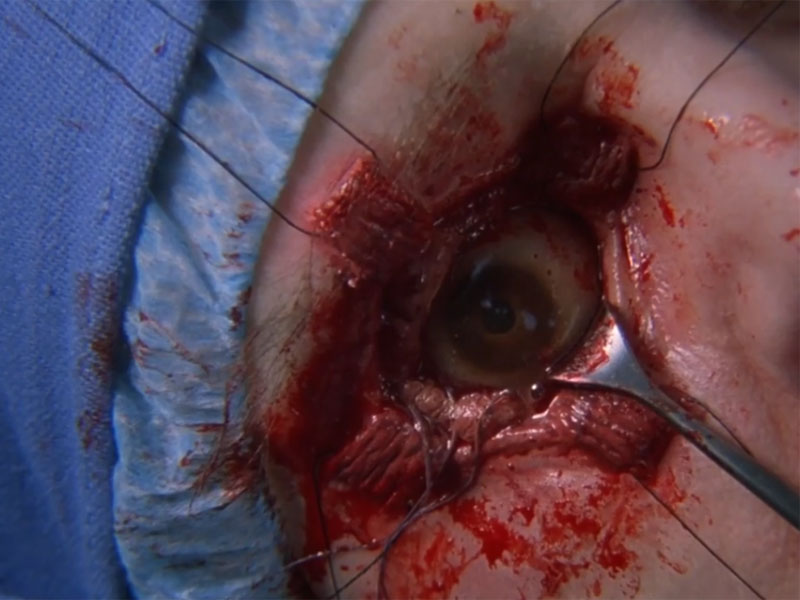
Martic passed all his rolls, took 11 points of damage (2d10) of which half (5hp) came off his Max HP and he took a permanent -1 penalty to his Charisma. Had he failed his saves, I would have still allowed him to succeed but the penalties would be worse. Before he passed out, he shoved the gem into his empty socket. The gem fused with all his severed nerve thingies and optical doohickeys. Martic looked up at the ceiling and cried, “I can see everything!” Then he passed out. When he awoke, he can use the gem three times a day to see in darkness, see invisible creatures, see through illusions, identify any shapechangers (this would have been useful with Pox/Gwen) and can even see into the ethereal plane (which is where the hags hang out!) A well-earned boon and one I’m sure I’ll regret before the campaign is through.
As for the rest of their battle plans, the group decided to remove all metal armor. Since the beholder’s main attacks target saving throws, wearing armor to defend against his only melee attack, his bite, was useless. This will render the magnetic effect in the room moot. Gwen cast death ward on Thames, false life on herself, and bless on the rest. Martic would use his bug ability to “float” around, and Bag could use his claws to counteract the frictionless floor. And they both applied some of Bag’s poison to their weapons. Thames and Grum would flank the door just inside the room. Gwen and Savash will stay in the doorway, Gwen casting spells and Savash standing by to pull downed heroes out of the room. It’s as good a plan as any. Let’s go kill a beholder!
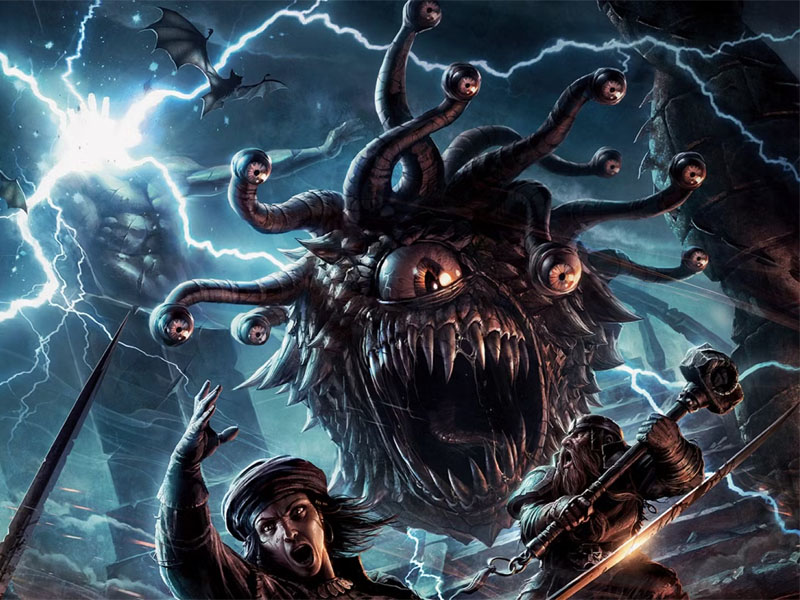
As they snuck back toward the Belchzorh’s lair, Martic cast silence on the area just before the still open door and they cast darkness in the same area. The spell radius was just outside the area where the heroes would stage there attack, allowing them to see and cast spell normally once at the doorway but offering cover during the approach. Martic used his magic eye to lead the group through the darkness. He could see that Belchzorh was floating in the far corner, with his back to the door and all his eyestalks looking elsewhere. Maybe he was admiring his treasure collection; really, I just want to give my group a surprise round as a reward for good planning. I know that a beholder has an impossible to surprise passive perception, but I don’t care, this beholder is surprised.
Floating out of the quiet dark, Martic casts faerie fire on the beholder, illuminating it for all to see. Everyone unleashed their most powerful attacks upon the beast, and Martic activated his oathbow for only the second time the campaign, knocking it back for over a quarter of its total health. Belchzorh didn’t have any smart-ass comments this time as it reeled in pain and surprise. I continued rolling the beholder’s attacks randomly using a d6 to determine the target between the four heroes and the two NPCs, and a d10 for the effect. I still used the beholder’s telekinesis to remove the cloth from the magnetic orb. This will affect any ranged arrow or spear attack, forcing those rolls at disadvantage, but mostly this was a spell vs. eye beams battle. I also had no real use for Belchzorh’s anti-magic ray. It would have negated any of his normal eye beams and the spell casters were spread out far enough to make this ability pointless. Mostly.
Even with all the preparations and awesome initial onslaught, this was a real back and forth battle. Belchzorh attacked with Slow, Sleep and Death Rays. Martic and Bag made their saves, but Thames did not, to the tune of 55 points of damage in the very first round. The party pressed and continued to chip away at the beholder’s hit points. The beholder countered with his Enervation, Telekinetic and Petrification rays. Bag saved again, saving him from being turned to stone. Grum failed and was thrown into the air 30 feet, taking 11 points of damage when he landed. Thames made his save and only took 18 points of damage, prompting Gwen to waste another turn healing the dragonborn.
But the next round, three heroes rolled critical hits, knocking the beholder down even further. Bag of Nails even ran along the wall, jumped off and landed on the beholder, slicing off one of his eye rays. Bag rolled on the beholder attack table and ended up chopped off the petrification eye stalk. No more medusa abilities for this bastard. Belchzorh reeled in pain and went berserk, blasting out another Enervation ray, plus a Paralyzing ray and a Disintegration ray. Even with the bless spell, everyone failed their saves. Bag took more damage, Martic was paralyzed and poor Thames (after three back to back assaults that all did major damage) was disintegrated into a pile of fine grey dust.
Except, that the death ward cast by Gwen had saved his life. Thames was spared but in serious trouble. He had but one hit point, was no longer protected from more death, and was no where near Gwen for more healing. Thames tried to run out of the room, but he failed this save too, fell prone and slid across the floor. Things were looking bleak. Martic was frozen and failed his save again. Thames was prone and unable to get up, and everyone else missed their attack rolls. Belchzorh pressed his advantage with another three rays. Bag of Nails finaly failed a save against Fear and attempted to run away, prompting an opportunity bite against the fleeing feline. Grum who had just gotten up from the last attack was again thrown into the air with another Telekinetic ray. At least Martic made his save against his attack and remained just paralyzed, not paralyzed and charmed.
I had activated the beholder’s anti-magic cone in an attempt to cripple the artificer because I ruled that Belchzorh would mistake Thames as a wizard, which he is not. Fortunately, Bag of Nails ran right through this zone as he fled out of the room, ending the spell effect on him. Thames was able to get up and get out of the room where Gwen could heal him, Grum picked himself up off the floor again, and Martic finally passed his save against the paralysis. We need to kill this thing fast!

The newly revived Martic hit Belchzorh with another critical doing major damage. Bag of Nails jumped back onto the beholder and even though the attack wasn’t a crit, it was a called shot, so I allowed that he got to chop off another eye stalk, this time taking out that dreaded disintegration ray. Gwen, finally not forced to just cast healing spells, withered the beast with a huge blight spell. But it was Thames who had the coup de grace. As his bonus action, he did his standard “cannon to the face”, but it was not enough to take the eye tyrant out. That’s when Thames surprised us with a thus-far unused ability. As his main action, he threw the cannon at the beholder and just the weapon was about to poke Belchzorh in his big, dumb eye, Thames blew up his cannon! The ensuing explosion emolated this over-inflated pinata, it’s flaming husk falling to the floor like a writhing Hindenburg with Bag of Nails riding it like a mechanical bull. Bag took damage from the blast, but was mostly protected by the gas-bag’s corpulent corpse. That’ll teach you to almost kill everyone’s favorite dragonborn artificier.
Searching the beholder’s lair, our heroes find the largest treasure horde of the official game; thousands in coins and jewels although by this point in the campaign, money is totally useless. There’re also several magic items but nothing that affected the game or was even used within the dungeon. If your players missed obtaining the immovable rod back in the shrines of Omu like mine had, I would consider adding it here as a well-earned reward and something that would very likely be used later. I did not do this, but wish I had. After the looting, we moved downward to:
With Belchorzh’s death, we have finally cleared levels 1-3 of this endless tomb. They technically missed one room containing a genie, but I don’t see any way for them to discover this location, nor do I really want them to. We descended down to Level 4 and an encounter with a monster that I consider iconic, but I don’t think gets the love it deserves when compared to Acererak and the Green Devil Face in the OG Tomb of Horrors. The Four-Armed Gargoyle.
In that original adventure, the gargoyle is missing an arm and there is a whole puzzle involving placing gems in the hand of the severed appendage. A single Four-Armed Gargoyle is more than enough, but in this current adventure, the motto has always been, bigger, badder, and more of it. Four times more, in fact, as our heroes descend to the bottom of the grand staircase to find four of these monstrous stone guardians, each on its own pedestal surrounding a dark gaping hole in the floor.
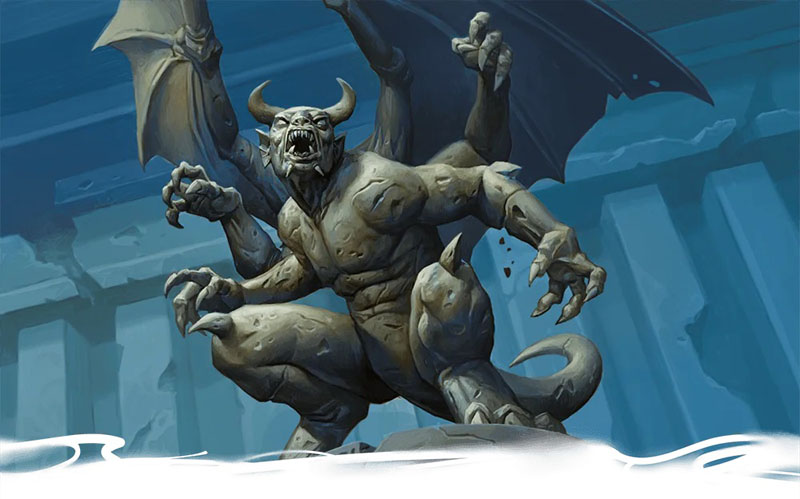
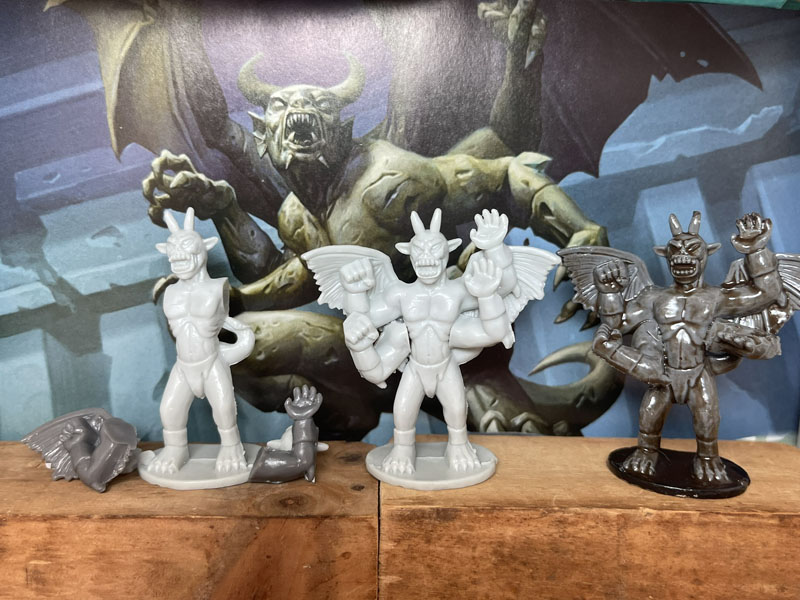
My only real dilemma with this encounter is plastic. Tiny little pieces of molded plastic; the minis. There is no official miniature of this infamous monster. There is, but it is only found in those loot crate mini packs that feel like gambling and I hate. And I’m not spending $80 on eBay for a whole set of four. Time to break out my arts and crafts kit.
Ages ago, I bought a cheap, cheap pack of generic monster minis. It had 10 minis in it labeled as “devils”. I used one as a home-brewed swamp demon seen in Waterdeep: Dragon Heist Session 2, but I haven’t used them since. Let’s fix that. I cut the arms of four of those minis and shaved off the remnants of the demon’s wings. Next, I shaped those arms to fit into the crux of the still whole minis, and attached them with superglue. Not my best work, but they came out pretty good, looked like what I wanted, and I saved 80 bucks!
Of course, there is a good chance that this work with be for naught, as there is a real possibility that our heroes might do the smart thing and not activate these gargoyles. Who am I kidding? Of course my group managed to anger these statues, sparking another avoidable fight. Each gargoyle stands on a box with a plate of a specific metal; copper, silver, gold, and platinum. Each box also has a small slot the same size as a coin. Our heroes easily deduced that a toll was needed to pass safely. Just one coin of the appropriate metal per person per box. The total cost would be less than 37 gold. But we just couldn’t do it.
Most everyone was willing to pay. Except for Bag of Nails. It wasn’t entirely his fault. He was playing his character possessed by greedy, chaotic Wongo, and maybe it wasn’t my best idea to introduce a PC with a death wish, specifically death by combat. Bag might want to die, but the others kinda want to live. Well that’s too bad. We’re fighting four-armed gargoyles!
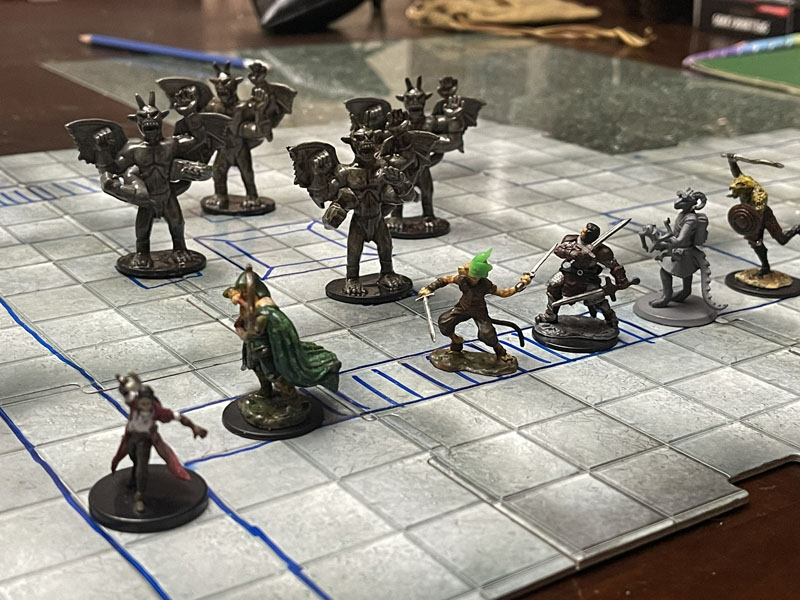
Despite the iconic monster, there wasn’t anything spectacular about this fight except that it was made more difficult coming right on the heels of fighting the beholder. Our heroes were already down about half of their resources and were unprepared for the fight. I waited until the first character attempted to leave the room. This put everyone right in the midst of the area and spread out more than they would have liked. No one seemed surprised when the gargoyles sprang to life and attacked. They were a little surprised when they realized that theses gargoyles each got four attacks a piece, which put our heroes at a major disadvantage. This is gonna be another long battle.
The group was getting overwhelmed by these gargoyles that could also fly out of melee range if needed. We needed to quickly reduce their numbers and somehow separate them so we could take them on one at a time. Gwen stepped up and was the all-star of the battle. First, she banished one of them (the copper one) into the unknown. Hopefully, it suffers the same fate as that slaad from earlier. (It doesn’t.) Next, she pretended to be a bard and attempted a vicious mockery on these stone abominations as she ran back up the stairs, hoping to entice a couple into following her. What she planned to do once they caught up with her on an upper level with no fighters to protect her was unknown.
But the plan worked. The silver and the platinum gargoyles took flight after the fleeing cleric, leaving the gold one down below to be demolished by the others. Bag of Nails got a crit on this gold gargoyle resulting in this Four-Armed Gargoyle getting a limb hacked off, making it the perfect call back to the original Tomb of Horrors encounter, even if I was the only one who would appreciated it.
Meanwhile, Gwen ran up to the top of the stairway and the gargoyles were closing in. Just before they could reach her, Gwen flung herself over the railing and plummeted over 200’ to the bottom! Thames was beside himself. He was all out of 1st level spells and could not cast feather fall like he normally would in these scenarios. Gwen was doomed. But just before she splattered all over the floor, she spread her arms and swooped like a bird to gracefully land beside her companions. What no one knew was that due to her possession by the Trickster God Papazotyl, Gwen was immune to falling damage. I flavored it so that she could glide down like a bird (not flying, but falling with style!). It was a great secret reveal that played perfectly in the moment. I love it when player get to unveil new abilities to surprise their shocked companions. With Thames’s exploding cannon, that’s makes it twice in just this session. Cool.
By the time the gargoyles got back down to the fight, our heroes were waiting to smash them to pieces. Soon, gargoyle rubble lay strewn all over the floor. At one point, they actually paid all the needed platinum pieces, so I had that particular gargoyle return to its pedestal and turn back to stone. The banished copper gargoyle failed to return and the heroes assumed it was destroyed. (It wasn’t.) I love player assumptions. Don’t worry; both of these gargoyles will return.
A few other interesting bits came out of this fight. I finally had Grum profess his love for Gwen after he failed to protect her during the fight. This NPC arc has been brewing for a long time and is especially funny since it was Gwen’s player that never wanted Grum to join the party in the first place. Thames also had a cathartic moment as he hugged Gwen after her inconceivable survival. The xenomorphic dragonborn was just glad that this human whom he has come to respect was still alive. Then in the next moment he was mad at her again for not telling them about her secret. Thames nearly had a heart attack! After the battle, the group never bothered to break into the coin boxes missing out on some irrelevant loot. But they did take note of Acererak’s Fourth Warning and tried to guess what horrors awaited them.
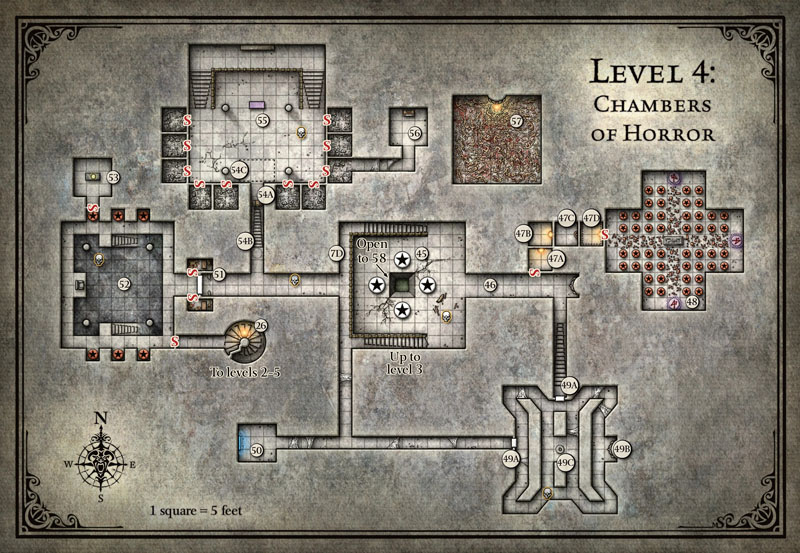
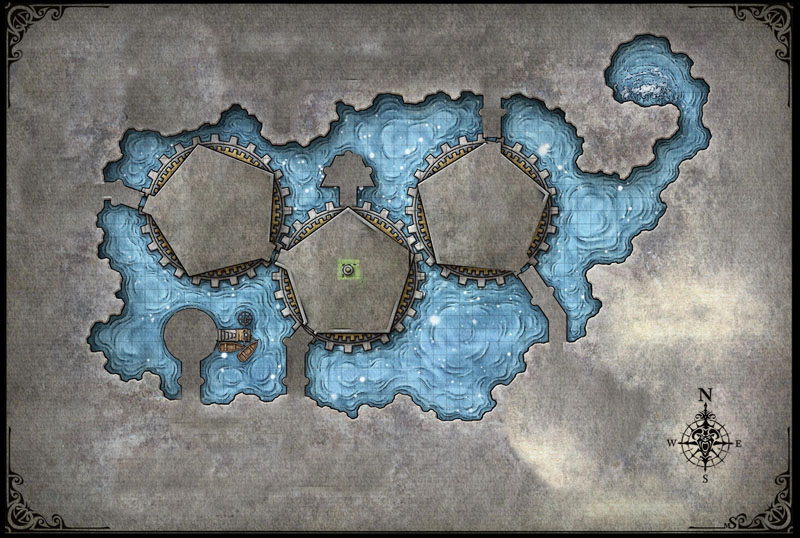
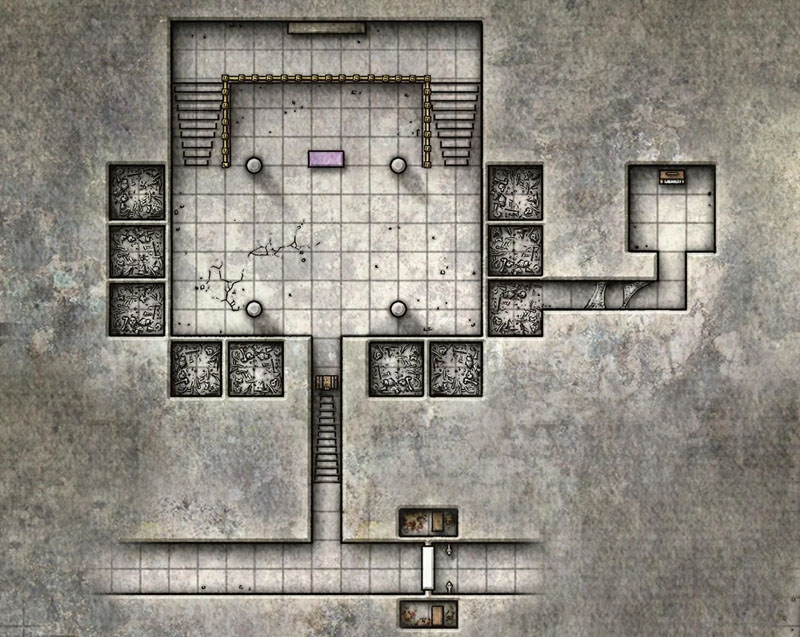
They also took a peek into the gaping hole in the floor. I do not like the way this hole connects with the lower level. The book says that the shaft drops 15 feet of solid rock directly into the ceiling of Area 58 Cog of Hate. But that means that the cavern in which this cog and the others are found is, at best, 15 feet tall. This makes everything seem small and hard to describe. Also the hole is not in the center of the cog. Does this mean if the cog rotates then these holes will not line up? And is there a gap between the roof of the cog and roof of the cavern? Can the players slip through it? It seems that there is a five foot gap, so maybe they can. It is all very confusing.
My cavern is 50 feet tall from the surface of the water to the roof. The hole in the floor of the gargoyle room descends 15 feet through solid rock and opens onto the cavern below. My heroes can see the layout of the entire level, including the three interconnected gears with various stone covered hallways extending away from them. The can see the murky water of the underground lake and even the small dock with rowboats and a floor to ceiling tower of stone rising up to the left. They cannot see within the hallways or any features that exist beyond the cavern walls. Now, the heroes can see these things in the cavern, but they cannot get to them. Some invisible force creates a tube that connects the roof of the cavern all the way down to the hole in the center of the middle gear. There are no handholds in the invisible tube, so the only way to make the 65-foot drop into the lower room is to use ropes, fly, or fall.
My group ignored this area for now; they were intent on clearing out the fourth level. Heading west, I moved Area 51 Ghastly Door to be in front of the intersection that leads to Areas 52 and 54. Beyond this, I made no significant changes to this area. It also isn’t meant to be a real problem for the players; just another detail thrown in to make the tomb creepy and macabre. But by this time, my players were primed that everything in this tomb is a live or death dilemma to be solved. They took forever to try and get past this door with no ill effects.
I really played up the muffled grunting noises of the unseen ghasts behind the statues and the blood crusted fangs on the bronze snakes. The group guessed that the statues required a blood sacrifice. Savash even mentioned that they use something similar to drain the blood from their victims in the Yuan-ti temple. My players tried to do anything that avoided placing their own arm into the sacrificial mouths. They tried to use the canteen filled with the “water” collected back in Area 9 Magic Fountain (Session 42). This ruined any plans I had for that poisoned canteen. C’est la vie. The snakes actually spit this water back at the group when they poured it in. Next, they went all the way back up to Level 1 to get the corpse of Pox the doppelgänger and use it as the blood sacrifice. Unfortunately, the body has been dead too long and had no blood to suck.
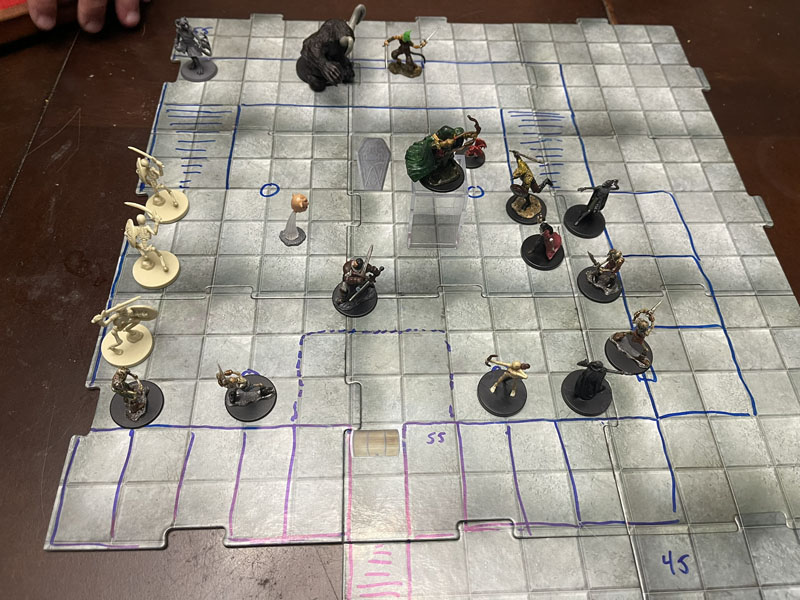
Ultimately, two players had to submit to the sacrifice. The two with the most remaining hit points stepped forward and placed an arm into the mouths of the bronze snakes. I flavored it that each snake clamped down upon the arm of the victim and drank with a loud slurp, like a demonic dialysis machine. The book says it needs a pint of blood for each statue, but gives no rules about what that does to a hero’s health. Since the human body had about 10 pints of blood, I ruled that sucking one pint from the body would remove 1/10th of that character’s Max HP. A hero with 70 max hit points would lose 7hp, etc. The damage comes off their regular hit point total and can be healed normally. A penalty not even worth the time it took to “solve” this room. Once the trap had been satiated, the doors opened to reveal hallways that ran west and north. Our heroes chose north toward:
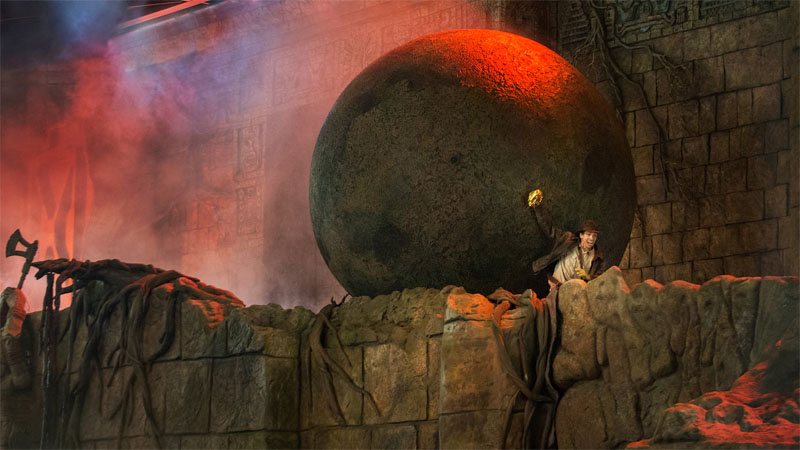
Area 54 Rolling Doom. I made no changes to the area but there are a lot of moving parts to this trap. First, there is the suspicious locked chest at the very bottom of the stairs. There is the acid pit ten feet beyond that in the next room. Lastly, there is the hidden granite ball (ala Indiana Jones) that will roll down the stairs pushing everyone in the area into the acid pit. My group tried to be smart and checked for traps. There were three people in the area; Gwen, Martic, and Bag of Nails. As usual, Thames avoided all traps by never going near anything that even remotely looked like one, so he stayed in the upper hallway with Savash and Grum.
Playing fair, I ask the three players what they are searching, hinting that there may be more to this trap than just the chest. Martic checked the chest, Gwen checked the floor beyond the chest, and Bag checked the stair, specifically the floor, because he was convinced that the stairs would become a ramp that leads to instant death. Humh, very similar to a trap in the OG Tomb of Horrors. I wonder if he knows about that.
Well, no matter, this isn’t that trap. Bag failed his roll (and also wasn’t checking the ceiling), so he didn’t not discover the secret compartment. Gwen passed and discovered the edges of the pit in the next room. As for the chest, it is trapped but the book doesn’t give any way to spot it. I ruled that a DC10 check will determine that the latch is not trapped, but only a DC25 check will spot that the inside of the lid is trapped. Martic rolled a 14. He is certain that the chest doesn’t have any poison darts or similar latch traps. But he missed the big one, so I still get to spring the surprise on them
Martic unlocked the chest and opened it to reveal that it was empty, but not quite. I decreed that it has been less than an hour since the fight with the beholder. Thanks to his newly acquired eye, Martic still has true seeing active and can easily see the invisible key at the bottom of the chest. He quickly scooped it up just as the Indiana Jones rock began rolling down the stairs, primed to crush everyone in the area. Bag of Nails was first in line. The rock is five feet in diameter. It blocks the full width of the hall, but not the height. Bag of Nails used his climb walls ability to simply jump out of the way and climb to the ceiling. Martic used the last of his daily ability to allow his swarm of bugs to coalesce under his feet, allowing him to float above the rock. The Rolling Doom passed harmlessly under their feet.
Gwen had no such gimmicks and had but one choice. Run! Gwen ran toward the opposite room and the acid pit where Gwen faced her greatest nemesis; jumping. Gwen and the rock arrived at the edge of the pit at the same time. She leaped as far as she could just as the rock smashed through the floor landing with a huge splash in the vat of acid below. But Gwen did not leap far enough. She failed her roll and was about to die when she used the inspiration point I had just given them earlier today. This time, she passed and was just able to grab the ledge to avoid the liquid death. This was the closest she came to permanent death. This was a true Save-or-Die trap and Gwen barely escaped with her life. The damage here would have instantly killed her. Grum was relieved.
The path was now open to go to the next room except that a giant, acid-filled pit blocked the way. Gwen was on the right side, but everyone else was not. They probably could all make the 10 foot jump over the pit but no one wanted to risk it. They could not find anything that could bridge the gap. Until they realized that they have been carrying the perfect solution the whole time. The Folding Boat. The got this item back in Session 30 and had already used it as a shield to get past a poisoned dart trap in Session 41. In yet another unintended use, our heroes whipped out this throw away item and used it as a makeshift bridge. It was wobbly and precarious, but they all got across with a simple DC5 Athletics check. They left the boat in place as the entered:
Area 55 Unkh’s Tomb. Once again, I made no significant changes to this room. The scintillating colors on the sarcophagus told the group that this was the tomb of the flail snail, Unkh, even if the minotaur murals and the wall-mounted labyrinth seemed out of place. I texted Martic his spirit advice to wait for Ijin’s favorite color (gold) to open the coffin. No one was possessed by Kubazan, so I altered his advice to apply to reckless Wongo and texted Bag of Nails that treasure is in the maze and to go get it before anyone else. And since I like everyone to feel involved, I texted Gwen that clever Papazotl tells her that only the right colored key can open the sarcophagus. Thames gets no such spirit advice because he still refuses to play along.
Before anyone can do anything else, Bag of Nails sprints up the stairs and immediately touches the maze on the wall. To everyone else, Bag of Nails simply vanished. But they couldn’t worry about that now as ten secret doors open up and out stagger ten very angry minotaur skeletons. I swear this encounter only exists to justify the inclusion of this creature in the 5e Monster Manual. What are these things doing here? Of all the wacky encounters in this Not-A-Funhouse-Dungeon, this one is the most out of left field. And seriously, who has ten minotaur minis, never mind ten minotaur skeleton ones? Whatever. I used a mix of standard minotaur and skeleton minis. Just pretend.
As for Bag of Nails, he did not just disappear. He was teleported into the very same maze on the wall. He was trapped in the labyrinth with no exits and the howls of minotaurs all around. Because you can’t have a proper labyrinth without a minotaur. Looking up into the “sky”, Bag could see a sideways slanted view of his companions getting their butts kicked by a dozen such creatures. The one hero who is bred for fighting is stuck running around some dumb maze. Yes, this was on purpose. I’m a dick.
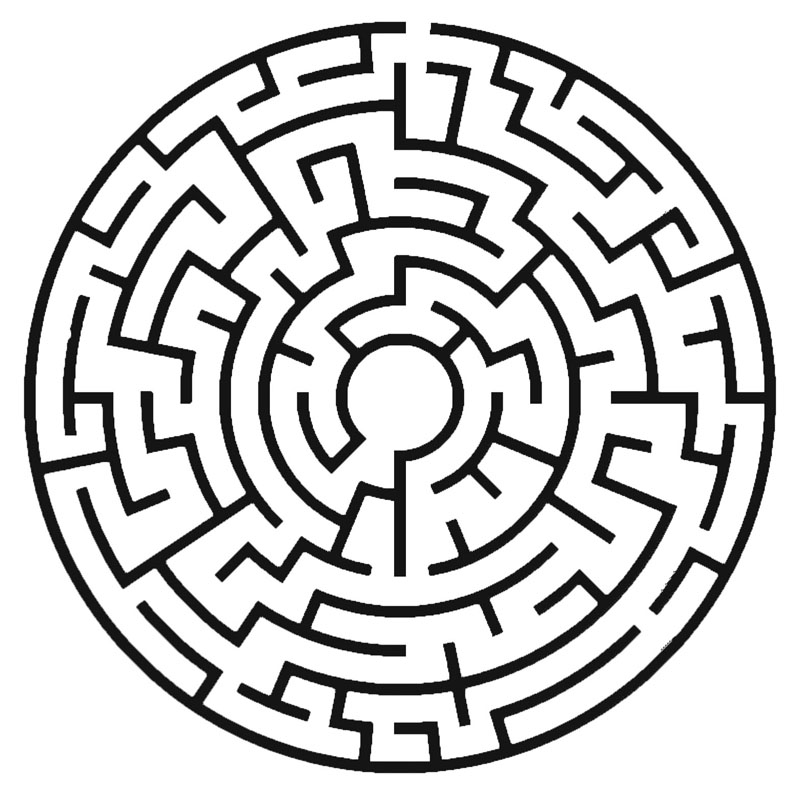
For each round of combat, Bag of Nails just ran aimlessly. No map is needed because that isn’t the point. At the end of each turn, Bag rolled his d100 die to see if he found the exit from this trap. Most turns he found nothing, but he did discover the dead remains of some previous victim and the enraged minotaur that Bag refused to flee from and spent five rounds killing it in solo combat instead of looking for the exit. Finally, he found the object he didn’t know he was looking for; a crystal key. But which one did he get?
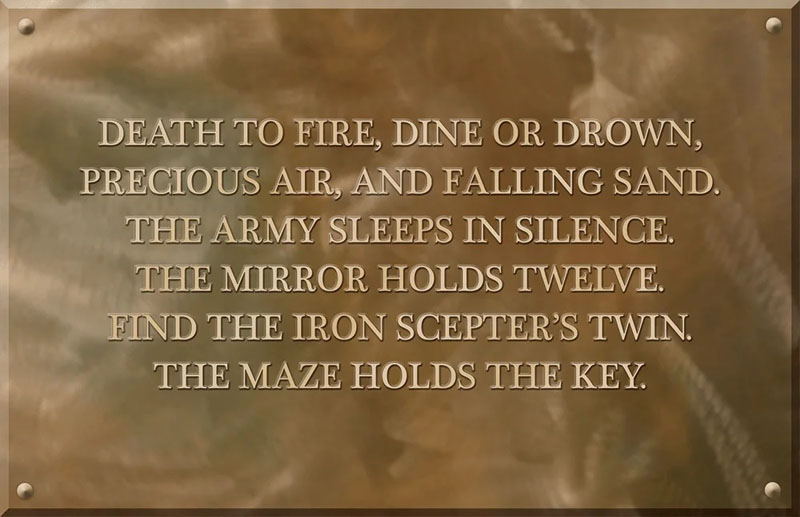
There are six possible crystal keys. Each different key granted a particular boon to the player wielding the key. If I were to assign a key, I would have made it the black one. That grants the hero the charm of nine lives and I thought I would be hilarious if the feline hero was the one to actually have nine lives. But I was determined to play a random game. I hoped that he would get the purple key and the charm of the maimed which would be very handy in an upcoming trap. Instead, Bag of Nails rolled for the red key and the charm of the ghoul which will provide some funny, disturbing moments in the next few sessions. As soon as Bag grabbed the key, he was whisked back into the real world and into a massive undead minotaur battle…
That was almost over. This fight was the sloggiest of all the fights in the entire tomb. Frankly, it was just dull and I didn’t have any way to make it better. Both sides traded blows. The most interesting moment of the fight occurred when Thames attempted to cast thunderwave to knock a few minotaurs into the acid pit. He succeeded and notched two kills, but he also knocked the folding boat into the pit where it was destroyed by the acid, never to be used in an inconceivable way ever again. In fact, that’s what we’ll call it, the S.S. Inconceivable. She was a fine, sturdy vessel, lost in a Sea of Sulfuric Acid.

Wrapping up the room, Thanks to Gwen’s advice, we didn’t waste time inserting the wrong key with the wrong color and the nasty surprise that come with that. Bag of Nails unlocked the sarcophagus to find the interior filled with salt, several pieces of unimportant jewelry, and the possessed robe of scintillating colors. They offered the robe to Thames who still refused to touch anything. By default, the robe went to Grum which was thematically accurate since this NPC never makes any decisions anyway. It’s all benefits with no downside for this guy.
This means that every member of the party (except Thames) is now possessed by something, even the NPCs Grum and Savash. We’ll see how long Thames can hold out. After this fight, the group was spent. They were mostly all down to single digit hit points and they were down about 75% of their spell slot. But they just had a long rest. Thanks to the natural barrier (the acid pit) blocking the room, the group felt pretty safe, so I allowed a short rest to regain their lost health. We’ll do the math next week.
Next week, we tackle the dungeon’s deadliest trap, suffer a betrayal, sniff out a new ally, and one hero confronts his son’s killer.
As always, do your best to embrace every outrageous player plan, especially those involving permanent disfigurement and Game On!
And if thy right eye offend thee, pluck it out and cast it from thee. – Matthew 5:29. Hey, if it came from the bible, it must be sound advice.
Don’t forget to check out my Tomb of Annihilation Resources Page, filled with all the stuff I use to make this epic campaign even more epicier: My full Campaign Diary, plus Handouts, Maps, Charts, PDFs, Images, and more to use, abuse, or ignore at your peril. All the templates and instructions for my Trickster Cubes are found here as well.
And written specifically for this adventure, read my Explorer’s Guide to Chult to delve into all the legends, lore, history, religion, and culture that I used to bring even more life to this adventure.


just today I thought, it would be great to read the next chapter of your awesome campaign. And oh boy, you did not dissapoint. Well played, well written!
LikeLiked by 1 person
I aim to please. Thank you.
LikeLike
HOLY CRAP I THOUGHT THAMES WAS GONNA DIEEEEEEEEEEEEEEEEEEEE
I’m sobbing and shaking rn that was terrifying to read. Glad everyone’s ok…
LikeLiked by 1 person
So did Thames. But he is okay. For now.
LikeLiked by 1 person
It is so useful to have someone else being just a few sessions ahead of my party, finding and solving the problems that would trip me up – like the overhead view of the cogs – terrific!
Also terrific – your 4 armed gargoyles.
Thanks
LikeLiked by 1 person
Glad I could be of some use. Now if only a million more people would play Tomb of Annihilation maybe my website can go viral. Cheers!
LikeLike
I noticed the other day that someone else had referenced you in the ToA reddit, so it’s starting, slowly.
If I search online for specific questions on ToA, your blog often comes up in the first three responses so you are out there.
I will publicise your blog, after we’ve finished ToA. I can’t do it beforehand in case my players see my online comments and read ahead and spoil the surprises. I wouldn’t be surprised if other DMs have the same constraint.
So please keep going, it is appreciated.
LikeLiked by 1 person
Interesting to know that others are linking to me. And yes the site has been growing in views. Truth be told I don’t do this for the views. I do it to help my fellow DMs. And you’re right. My site is NOT spoiler free. Anyway, thanks for the love.
LikeLike
Still feasting on your content and trying to mention you on Reddit as often as possible (I‘m not very active there, so don‘t get any big ideas 😉). It‘s just great stuff.
LikeLiked by 1 person
I’m one follower closer to a million. Thank you.
LikeLike